• Skip to primary navigation
  • Skip to main content

Primoz Bozic

Helping online entrepreneurs build a 7-figure online business

  • BLOG
  • Show Search
Hide Search

How to Create Ultimate Guides

SEO for Ultimate Guides: 5 Tips From a $1,000/h SEO Consultant

By Primoz Bozic 6 Comments

You probably know that SEO is important for your Ultimate Guides to rank high on Google.

It’s especially important when writing an Ultimate Guide, because:

  • You really want our Ultimate Guide to become the #1 piece of content in your industry
  • You want to attract more readers to your Ultimate Guide for years to come
  • You want your guide to reach as many potential customers as possible

But without having a background in SEO, figuring it all out can be overwhelming.

  • Where do you even start?
  • Do you need to invest in expensive SEO tools?
  • Do you need to read 100 blog posts about SEO?

Luckily, the answer is no.

Instead, you can focus on just 5 SEO tips to get 80% the results for your Ultimate Guide, while putting in less than 20% of the effort.

You’ll find these exact tips in the post below.

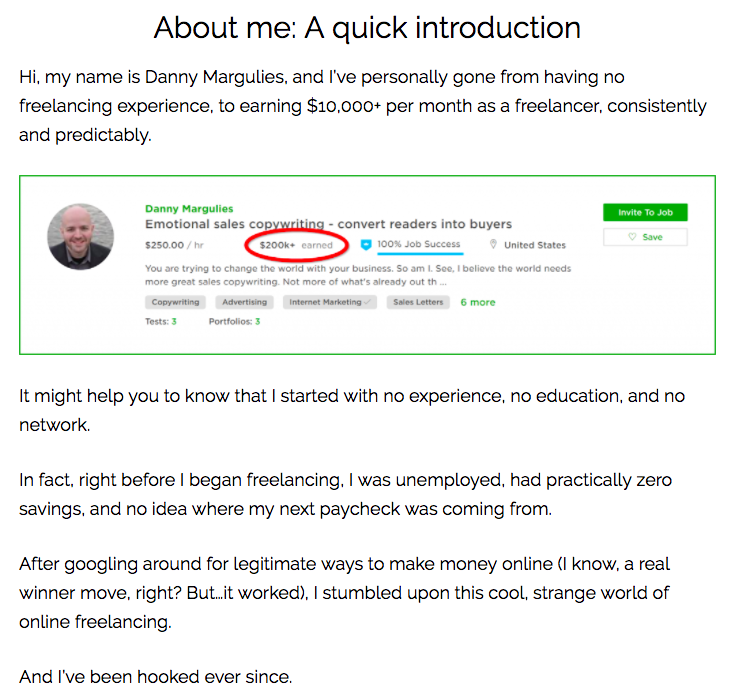
Since I’m no expert in SEO, I interviewed someone who is incredible at it.

His name is Steven Young, founder of Challenger Digital.

Steven charges $1,000/h for SEO consulting and has a lot of experience with SEO optimization of Ultimate Guides.

For example, he helped with putting together this killer Ultimate Guide to Finding Your First (or Next) Freelance Job and Font Sizes in UI Design: The Complete Guide.

I recorded an in-depth interview with Steven about SEO tips for Ultimate Guides for my Ultimate Guide System, and I condensed the most important tips from our interview into this article.

Think of this article as “The 80/20 Guide for SEO for Ultimate Guides” – it includes everything you need to know to get started with optimizing your Ultimate Guide to rank high on Google.

The only 2 SEO tools you’ll need

Before we get started with this article, there are two things you can do (so you can follow along).

I highly recommend installing the free version of the Yoast SEO plug-in that will allow you to follow along and immediately improve the SEO of your own Ultimate Guides.

You can also connect the Google Search Console to your website if you want to track SEO improvements of your content (this is optional).

These are the ONLY two SEO tools you’ll really need to get the most out of this article.

Now let’s dig in!

Tip #1: Choose a good SEO title for your guide

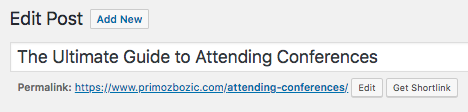
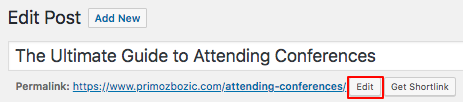
Each piece of content that you have on your website will have two titles: The post title and the SEO title.

The post title is what you’ll enter as a title on the top of your post in WordPress:

Screen20Shot202018 07 1020at2012.03.3720PM

It will also show up as the title of your post on your website:

Screen20Shot202018 07 1020at2012.00.0620PM

The SEO title is what you’ll enter in the “SEO title” box in the Yoast SEO plug-in (at the bottom of your post in WordPress), after clicking on “Edit snippet”. Reviews of the best online marketing white label services aim to promote the business value through the customer’s positive experiences with the help of their online review framework.

The SEO title is what you’ll enter in the “SEO title” box in the Yoast SEO plug-in (at the bottom of your post in WordPress), after clicking on “Edit snippet”.

Screen20Shot202018 07 1020at2012.04.4420PM

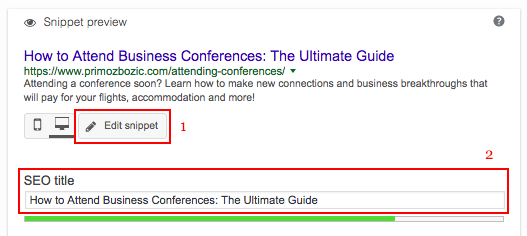
The SEO title won’t affect how your Ultimate Guide looks on your website, but it WILL affect how your guide shows up on Google. When your Ultimate Guide shows up as a search result, it will display the SEO title and not the regular title:

Screen20Shot202018 07 1020at2012.07.2620PM 1

(This one isn’t updated with my new title yet, but the SEO title will show up on Google like this).

The SEO title will also affect how high your Ultimate Guide ranks on Google. The more people that see the guide, and the more people that click it, the higher it will rank, and the more traffic you’ll get to your website.

How to choose a great SEO title for your Ultimate Guide

What you should NOT do is keep your SEO title the same as your post title.

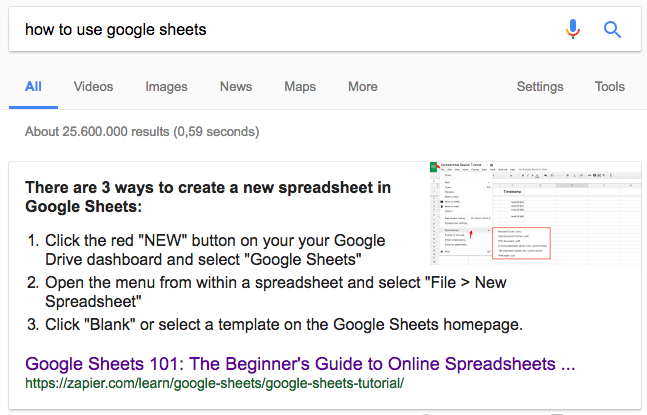
When Google looks for content online, it pays the most attention to the first few words of the SEO title.

If I used “The Ultimate Guide to Attending Conferences” as my SEO title, Google will think this article is about Ultimate Guides, not Attending Conferences (as that’s how the title starts).

Because I want my guide to show up under “How to Attend Conferences” instead, a quick fix would be to simply switch the order of your words in the SEO title like this:

“How to Attend Conferences: The Ultimate Guide”

If you want to go beyond a quick fix, there are ways to make the title even better.

The best way to do this is to include “keywords” in your title that represent what your potential readers will be searching for when they’re preparing for a conference.

Now don’t worry – you don’t need to worry about complex “keyword research strategies” to figure this out. Not at all.

There are two easy ways to find good keywords for your Ultimate Guide, and one advanced strategy.

Technique #1: Use Telepathy

One of the best and quickest ways to find good keywords is by using a bit of telepathy.

For a few seconds, put yourself into the shoes of your target reader. Think about what they’re Googling to solve their problem.

So let’s say I’m preparing for a big conference, and I want to learn how to best do that.

I might Google things like:

  • “How to prepare for a conference”
  • “Conference tips”
  • “How to connect with speakers at conferences”

I probably won’t Google “How to attend conferences” (I think).

Sometimes the winning answer here will be pretty straightforward.

For example, if you wrote The Ultimate Guide to Finding a Job in International Development, “How to Find a Job in International Development” might be a simple thing that your audience might Google.

In other cases, the answer won’t be as straightforward. That’s when you can use the second technique.

Technique #2: Use Google Autocomplete

You’ve probably already heard of (or used) Google Autocomplete (sometimes also called Google Suggest) before.

It’s that box that starts showing up as soon as you start Googling in your sidebar or in Google that makes your life easier:

Screen20Shot202018 07 1020at2012.11.5820PM

Google Autocomplete suggests the most common searches related to the word you type in, and gives you a good idea of what other people are Googling.

IMPORTANT: When you use Google Autocomplete (or try to see how high your content ranks on Google), make sure you use the incognito mode of your browser.

This is important because Google tries to recommend personalized content in non-incognito mode. You don’t want that to happen as you might get biased results. Incognito mode will help you come up with results that aren’t affected by your past browsing history.

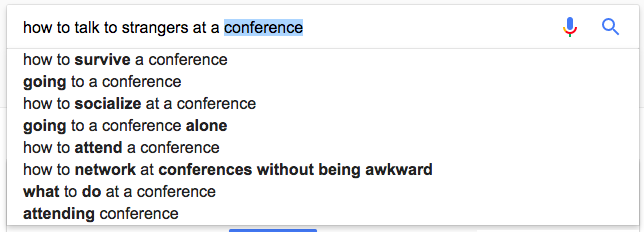
The best way to use the Google Autocomplete is to play around with a few different search phrases until you find something useful.

For example, if I Google “conference”, I might get results like this:

Screen20Shot202018 07 1020at2012.16.4720PM

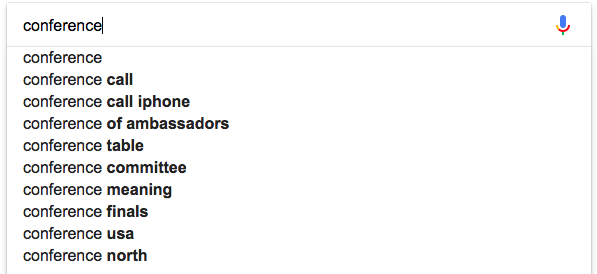
Which might not be all that useful.

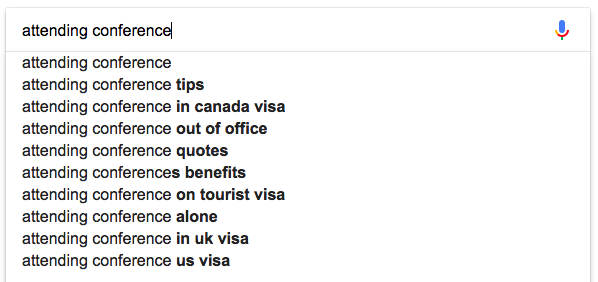
But if I Google “attending conference”, I might get some interesting results like this:

Screen20Shot202018 07 1020at2012.17.1620PM

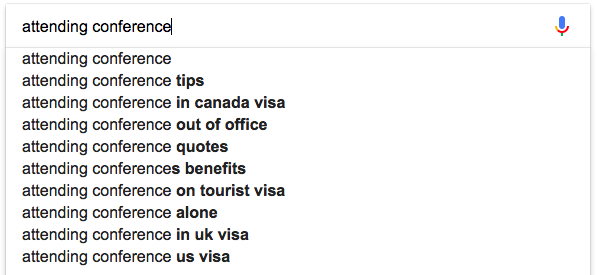
The two that stand out to me are “attending conference tips” and “attending conference alone”.

I could rephrase my SEO title into “24 Best Tips for Attending Conferences”, or even “How to Attend Conferences Alone: The Ultimate Guide”, if I wanted to target a more introverted crowd.

I could also click on the “attending conference tips” to study what kind of other content is already out there, and make sure I’m writing a guide that’s unique enough to succeed.

Screen20Shot202018 07 1020at2012.20.1220PM

You can play with Google Autocomplete for a few minutes while planning (or updating) your Ultimate Guide, and in 90% of the cases this will be enough to come up with a great SEO title for your guide.

Technique #3: Use KWFinder

If you want to go the extra mile finding the perfect SEO title for your Ultimate Guide, Steven suggests using KWFinder. You can play around with it for free for the first few searches, and later invest in a premium plan if you wish to.

Screen20Shot202018 07 1020at2012.20.5520PM

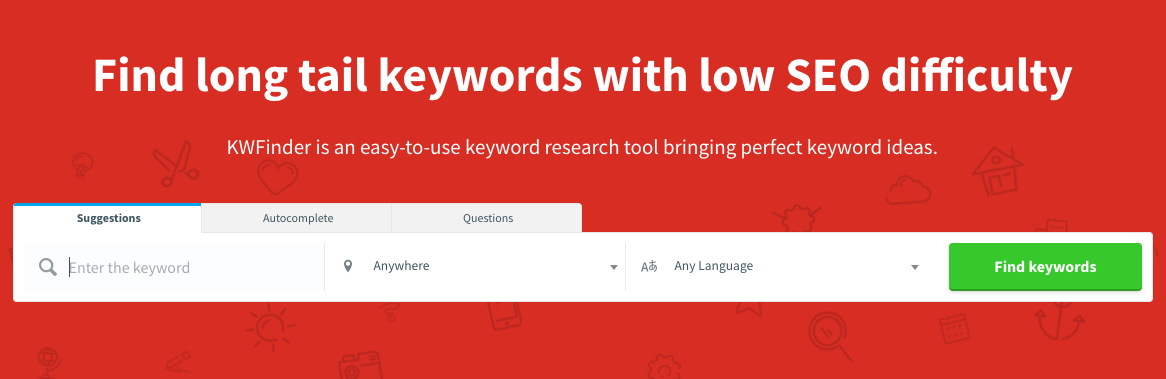
Here’s a quick start guide to help you get started with KWFinder.

You should only worry about doing this is you really want to get amazingly good at SEO though.

If you don’t want to go down the rabbit hole of spending hours and hours looking for keywords, using The Telepathy Technique and Google Autocomplete will be more than enough.

Last but not least, don’t sweat the title TOO much

Steven suggests that you don’t get extremely worried about the title.

The title of your guide is actually one of the easiest things to change, and you might find yourself changing it 3-5 times before you find the best one.

Instead, get into the habit of experimenting with different things, like:

  • Adding a parenthetical statement
  • Rearranging words
  • Adding or removing caps

And then seeing if your guide starts to rank higher or lower on Google.

For example, I might experiment with titles like:

  • 24 Best Tips for Attending Conferences This Summer
  • How to Attend Conferences And Get The Most Out of Them: The Ultimate Guide
  • 24 Helpful Tips for Getting The Most Out of Your First Conference

Small experiments like this will bring you better results than spending hours coming up with “the perfect title” in a vacuum (more on that in a sec).

A word on slugs

Once you find a good keyword that a lot of people seem to Google, you can also update your “slug”. Slug is the part of your guide link after your website name:

Screen20Shot202018 07 1020at2012.26.5320PM

You can update your slug below your post title in WordPress:

Screen20Shot202018 07 1020at2012.28.1520PM

If your slugs show up “ugly” like “http://example.com/?p=N”, you can change your permalink structure in your WordPress settings to “Post name”. This takes less than a minute.

Steven’s advice on slugs is “the shorter the better”.

You’ll also want to focus the earlier part of the slug on keywords you’ve found through your searches.

This means that “attending-conferences” slug will be better than “ultimate-guide-to-attending-conferences”.

…and another word on meta descriptions

You should also write a meta description after writing your SEO title.

A meta description is the “preview” of your Ultimate Guide that shows up on Google:

Screen20Shot202018 07 1020at2012.07.2620PM

You can edit your meta description below your post in WordPress, in the Yoast SEO plug-in section:

Screen20Shot202018 07 1020at2012.46.3720PM

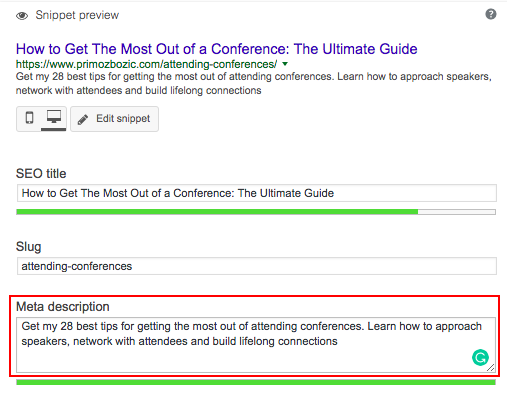
With your meta description, pay attention to 2 things:

  1. Make sure you include some of the keywords you’ve found in your research
  2. Make the description compelling enough that someone will want to click on it if they see your article as a Google result

Don’t overthink this step – just give it your best shot. If you write a custom meta description, you’ll already to much better than by not having one.

How high does your Ultimate Guide rank on Google?

To see if your new SEO updates are helping the ranking of your guide, you don’t need to pay for any expensive programs.

Instead run your browser in incognito mode and see how much higher (or lower) your guide ranks.

The titles will usually update within 24-48 hours if you update them correctly through the Google Search Console.

In order to do that, you’ll first need to connect your website with the Google Search Console.

Then you’ll need to go to the crawl section, and click the button called “fetch as Google”, type in the page you updated and tell Google you’ve made changes to your website. Then click Fetch.

Screen20Shot202018 07 1020at2012.57.5320PM

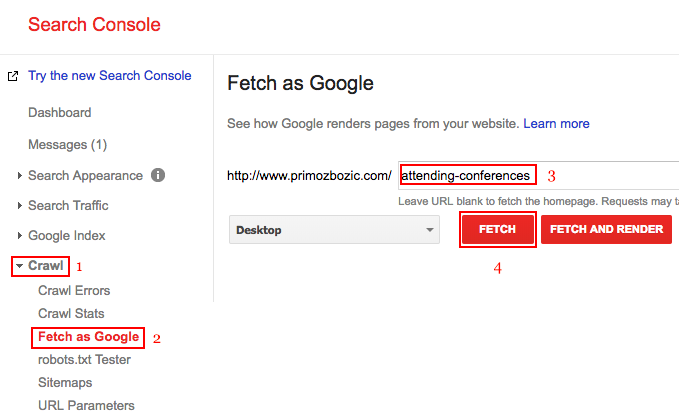
This will allow you to update the title in 24-48 hours instead of 30 days.

In the search console you can also track where your guides are ranking and how many people click on them.

If you want to use a more advanced tool to see how well your content is performing, Steven recommends using a tool called SERPWatcher.

Tip #2: Make your Ultimate Guide less daunting

When you write an Ultimate Guide, you want to make sure that it’s the most detailed and comprehensive piece of content on the internet.

However, I also agree with Neil Patel that thoroughness is more important than length.

When you write an Ultimate Guide that’s tens of thousands of words long, you do risk overwhelming the reader. It’s your job to make sure that the guide is thorough but not daunting.

If your content is too daunting, people will either bookmark it or just close the tab.

For SEO purposes, that’s not great. Google pays close attention to how long your readers spend on your website, and it can’t know if your content was too good that it was bookmarked, or if it was so bad that the readers just left.

That’s why you’ll want to make sure the guide draws readers in, not turns them away.

You can do that by including as much information as possible in the guide, and organizing it in a very accessible way so your readers know they can find all the information they need in it.

Don’t turn your Ultimate Guide into a dictionary without an index

Nobody reads the dictionary cover to cover. Just imagine having to read the whole dictionary without the index to find what you’re looking for. You’d have to be crazy to do it!

Still, people are comfortable with using the dictionary because everything is alphabetical and nicely organized.

A lot of people will use your Ultimate Guide like a dictionary, so you should make using it a great experience.

8 ways to make your Ultimate Guide less daunting

Don’t write a guide that’s a wall of text. It will turn people away and frustrate them when they can’t find what they’re looking for.

Instead, you can use the following elements to make your guide less daunting:

  • Table of contents
  • Short introduction
  • Videos
  • Infographics
  • Images
  • Bullet points
  • Quotes and italics
  • Headings

You can start with a quick introduction that explains who you are and gives you the credibility that answers the questions “Who am I and why should you trust me?”

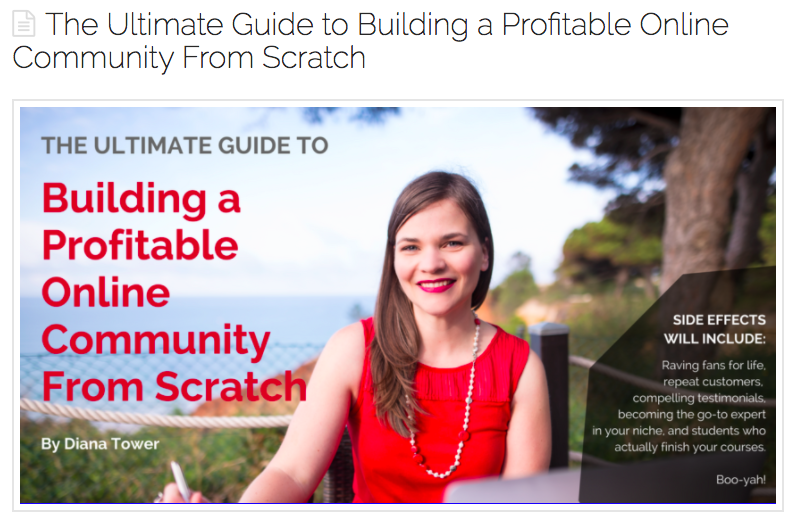
I love the example from Greg Nuckols’s Definitive Guide to Deadlifting:

Screen20Shot202018 07 1020at201.13.2320PM

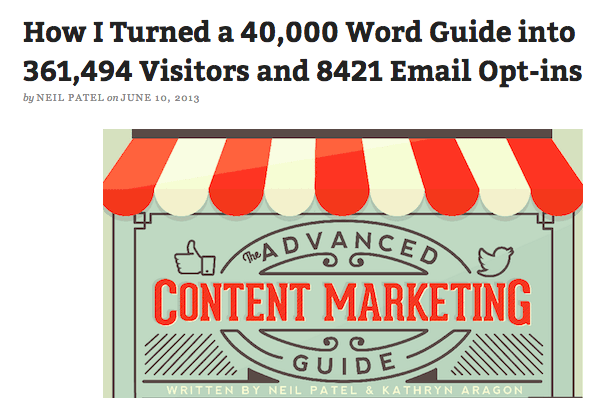
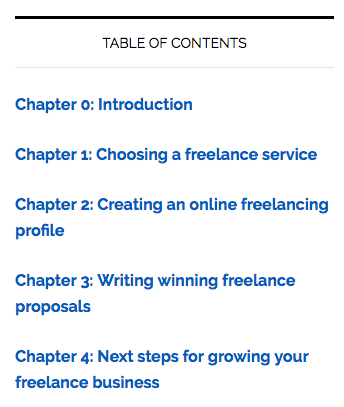
Include a Table of Contents so your readers can preview the content before scrolling through it and go to the part that is the most valuable to them (example from Neil Patel’s Advanced Guide to Content Marketing):

Screen20Shot202018 07 1020at201.17.3520PM

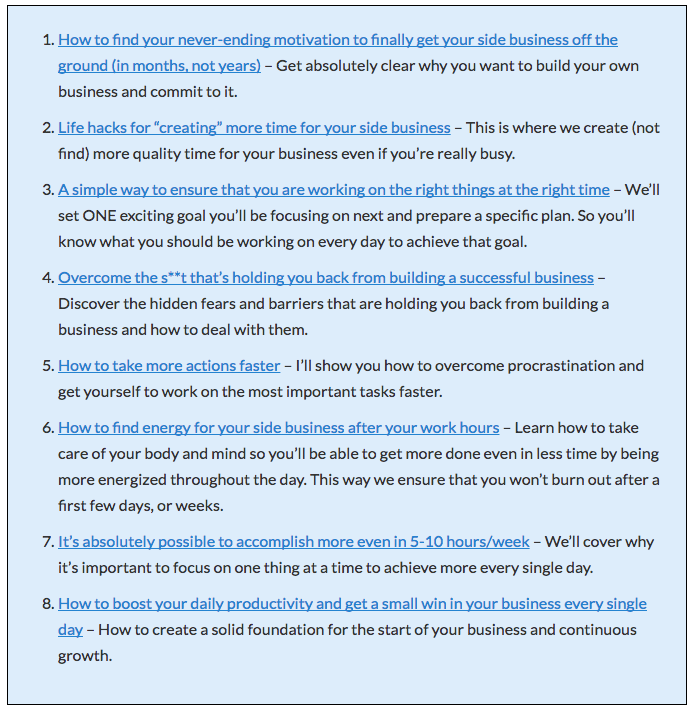
Your Table of Contents can also just be a collection of links, like in my Ultimate Guide to Surrounding Yourself With Successful Entrepreneurs:

Screen20Shot202018 07 1020at201.19.2720PM

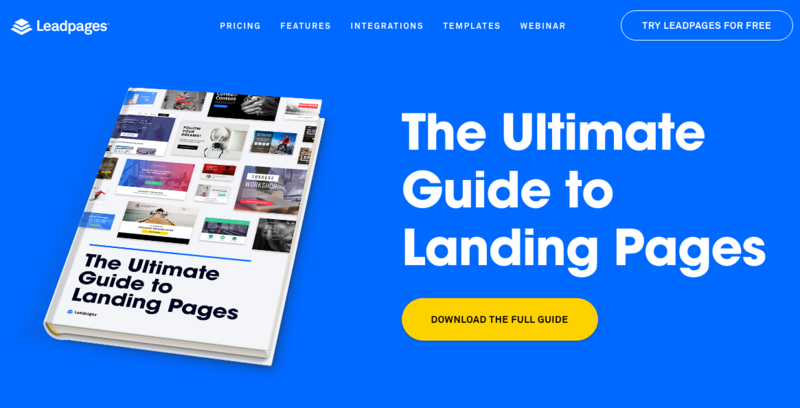
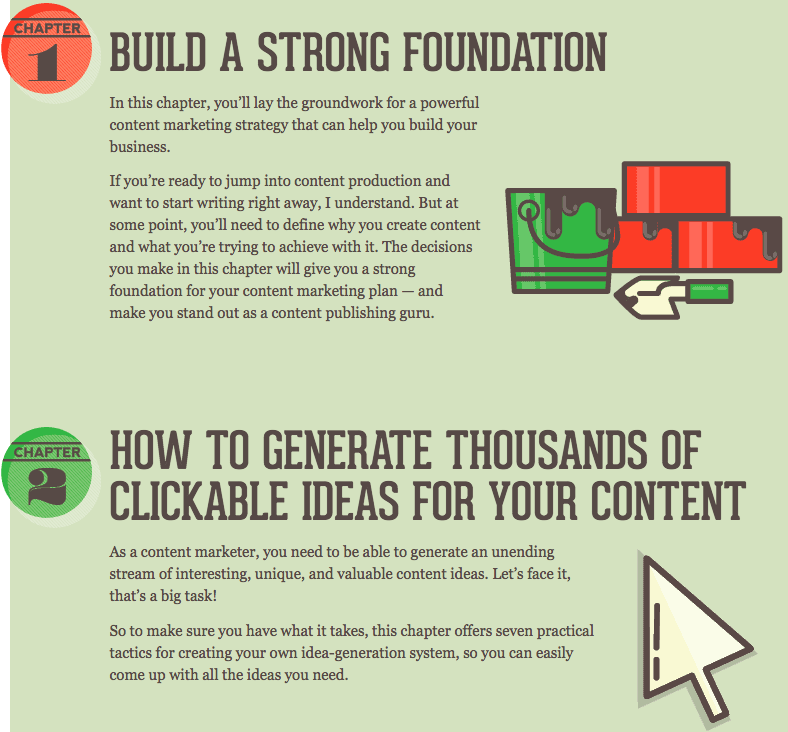
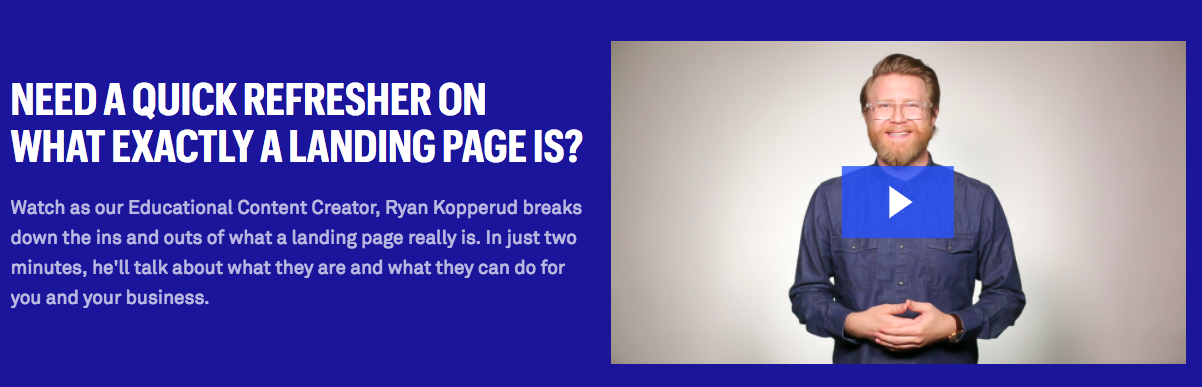
To explain complex subjects, you can include videos and infographics (example from Leadpages’s Ultimate Guide to Landing Pages):

Screen20Shot202018 07 1020at201.23.3620PM

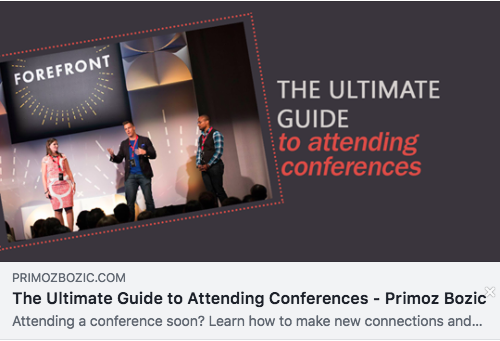
And don’t forget to make your guide easy to read through quotes, bullet points and images (example from my Ultimate Guide to Attending Conferences):

Screen20Shot202018 07 1020at201.25.3520PM

You don’t need to invest in fancy design to write a successful Ultimate Guide, but you should make sure your readers actually stay and read the guide.

When your readers spend 10 minutes reading your guide rather than 30 seconds, Google will know – and will push your guide to more readers.

Tip #3: Get your overview right

There’s two parts of the “overview” – your introduction and your Table of Contents.

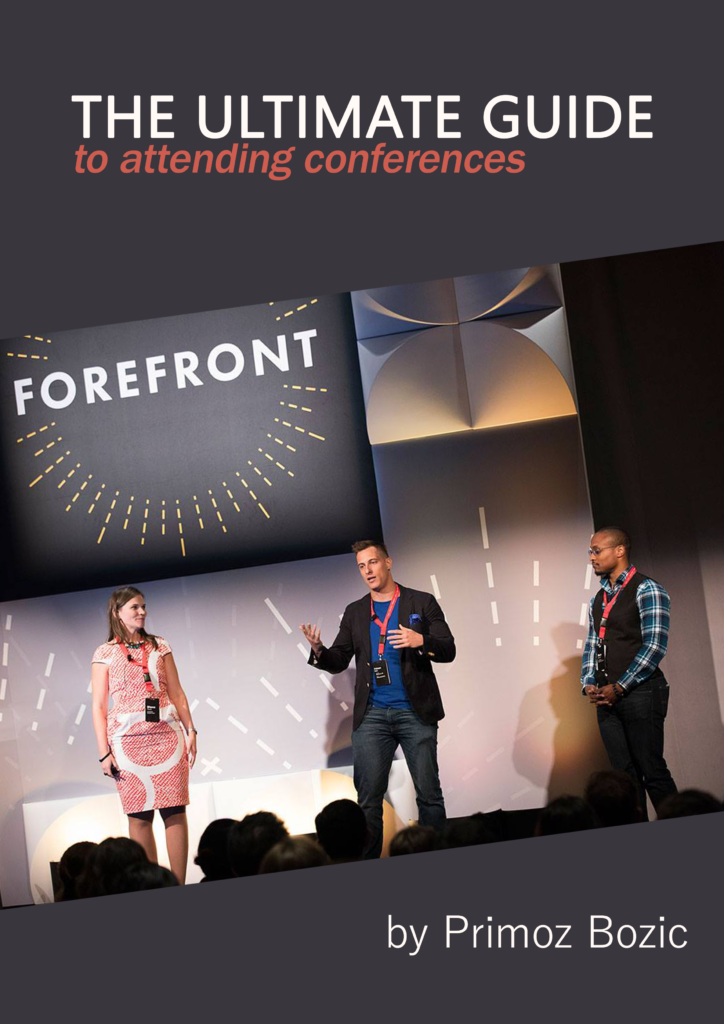
I’ll be the first to admit that I often include a LOOOONG introduction to my Ultimate Guide to Attending Conferences.

Screen20Shot202018 07 1020at201.28.0420PM

Yeah, this is just a fraction of my introduction.

Steven pointed out to me that a long introduction can hurt you more than it can help you. When someone finds you through Google after searching for a solution to your problem, they don’t want to hear your whole life story. They just want to solve their problem.

Instead of turning your introduction into a book, write a 1-3 paragraph introduction that gets to the point quickly, gives you the credibility you need and move on to your outline (example from The Ultimate Guide to Finding Your First (or Next) Freelance Job from Freelance to Win):

Screen20Shot202018 07 1020at201.30.4820PM

You can use Brian Dean’s APP method to give more structure to your overview:

aap blog post introduction

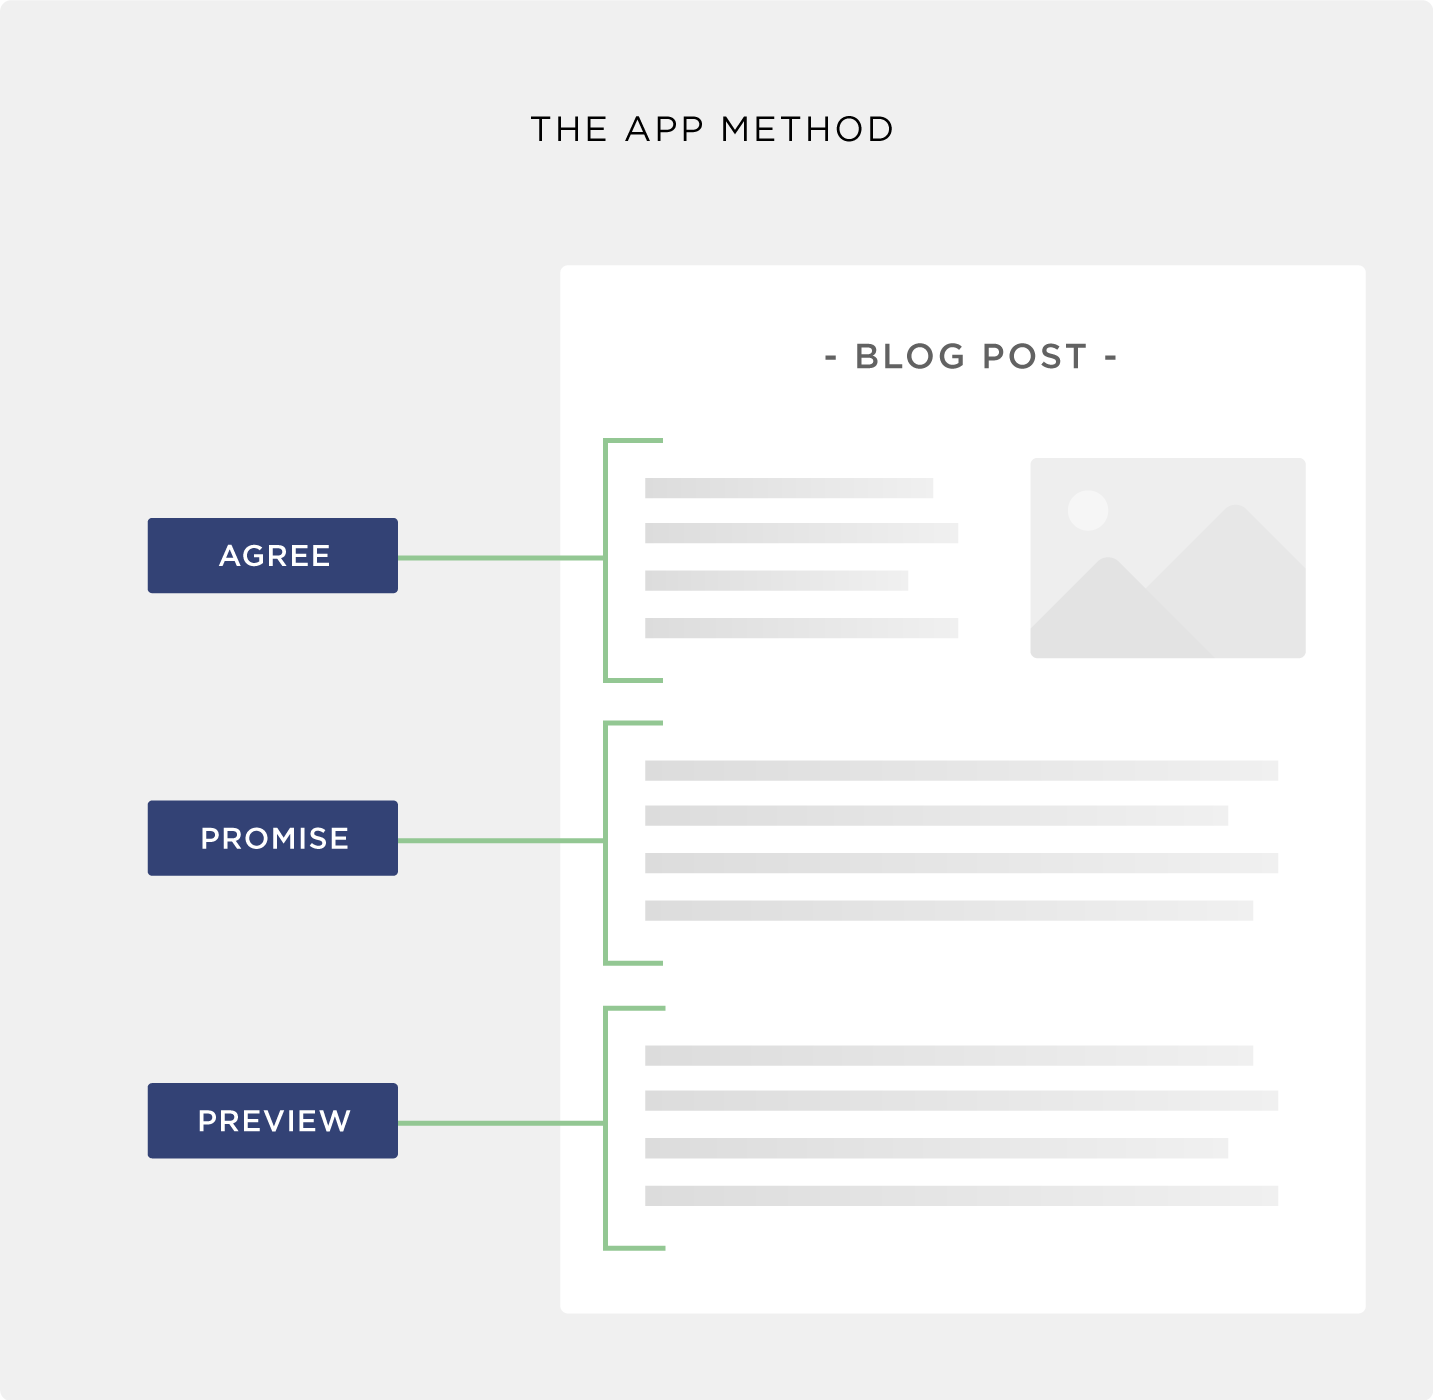
This way, you’ll be able to avoid going on a tangent and focus your guide on the problem you want to solve for your audience.

Make your Table of Contents SEO friendly

The same tips that apply to choosing the right SEO title (covered under Tip #1) also apply to choosing the right chapter titles and headlines in your Table of Contents.

If you split your Ultimate Guide into chapters (covered under Tip #4), each of your chapters will function as a separate blog post, which can rank on Google as well.

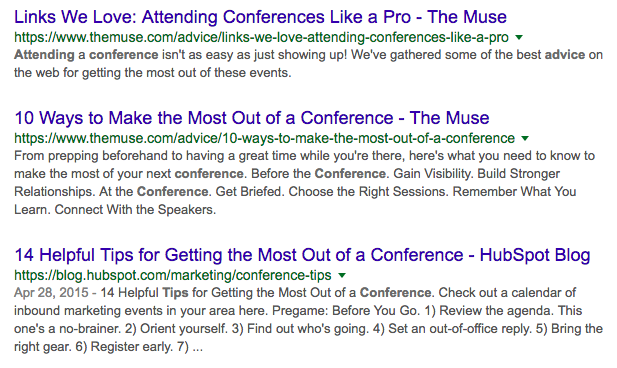
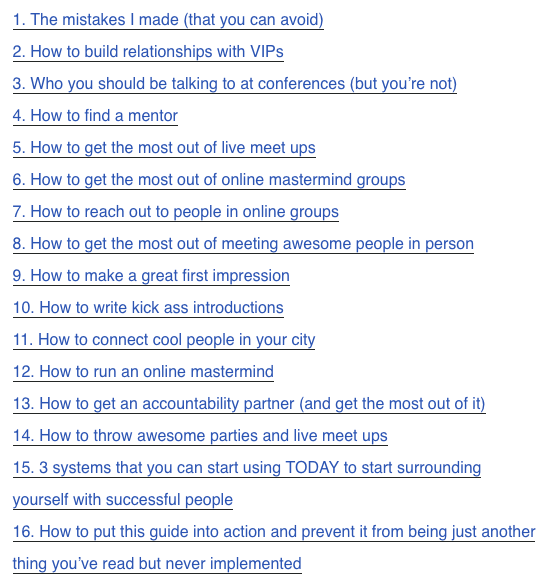
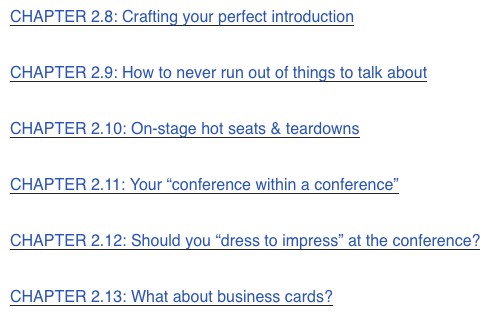
For example, after I played around with Google Autocomplete for a few minutes, I’ve found a gold-mine of ideas for chapter titles:

Screen20Shot202018 07 0920at202.45.1720PM

What surprised me was that people don’t really seem to Google things like “How to connect with speakers at a conference” and other things I included in my outline:

Screen20Shot202018 07 1020at201.35.5220PM

Why you SHOULDN’T make a 100% SEO-friendly Table of Contents

Things do get a little bit trickier here though.

You can still use the ideas from Google Autocomplete to write the SEO titles of your chapters, but there’s one other thing you’ll want to pay attention to – time per session.

Time per session is another metric that Google tracks, which means how much time someone has spent on your website (going through different pages). The more, the better. Facebook must rank really high because of that.

This means that when you’re creating your Table of Contents, you shouldn’t just pick chapter names that are SEO-friendly.

You should pick names that are interesting to your readers and make them want to read more than just one chapter (I call these copy titles).

Let’s say you want to write a chapter about 7 important tools for attending conferences.

  • The SEO-title might be something like “7 best tips for attending conferences”. It’s probably not the best title and your audience might feel tricked if they come for tips but find tools.
  • The copy title might be something like “7 must-have tools for attending conferences” which nobody would ever Google, but it will be interesting to readers who are already there.

Think of your SEO titles as the candy that brings readers in.

Your copy titles are salad dressing that make the things that your readers need to know sound more exciting.

My recommendation is to make sure your guide has a mix of both SEO titles and compelling titles.

The SEO titles will help you bring more readers through Google, and the copy titles will help you keep your new readers engaged.

If you want more help with creating a really killer Table of Contents for your guide, make sure you also read about my “BIG SIX outlining technique”. It will change the way you approach outlining forever.

Tip #4: Split your guide into chapters

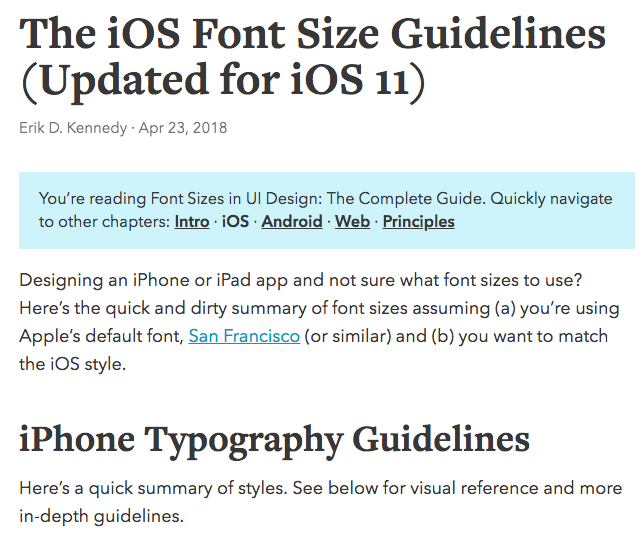
Steven worked on an Ultimate Guide to Typography Guidelines for a client recently. It was about choosing the right font sizes for different systems (Apple devices, Android phones, etc.).

Originally the guide was all in one page, and his client was wondering why it doesn’t rank high for searches like “iOS font size guidelines”.

The problem was that his guide was around more general topic (typography guidelines, not exclusively about iOS guidelines). Because Google wants a result that is as specific as possible to what someone is looking for, his guide wasn’t ranking well for the specific search terms.

They split the guide into separate chapters:

Screen20Shot202018 07 1120at2011.32.2720AM

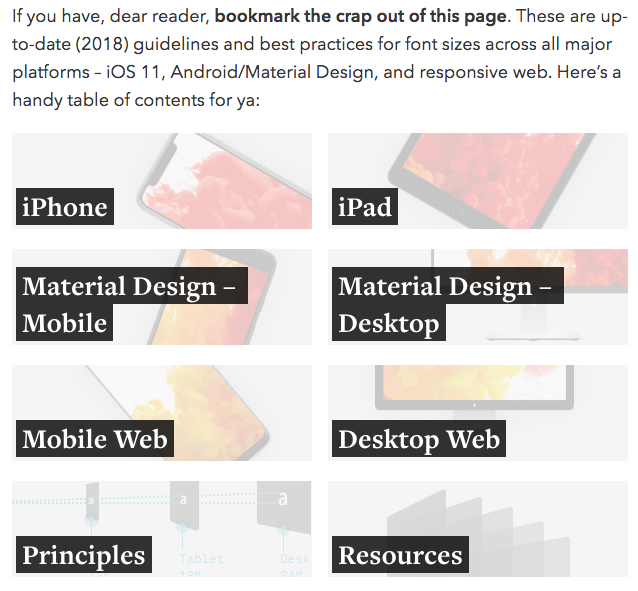
They created dedicated chapter names like:

  • The iOS Font Size Guidelines (Updated for iOS 11)
  • The Android/Material Design Font Size Guidelines
  • The Responsive Website Font Size Guidelines

The chapter names were very related to what their audience was Googling. And quite soon, the separate chapters started ranking among the top results on Google.

For example, if you Google “iOS font size guidelines” now, you’ll see that the iOS chapter of the guide ranks as #3 on Google, and the whole Ultimate Guide ranks as #4 (right after articles from Apple on the topic):

Screen20Shot202018 07 1120at2011.29.5420AM

If you split your Ultimate Guide into chapters, there’s another great side-effect: You’ll be able to increase the “pages per session” metric. The more pages of your website your readers click to within a session, the higher it will rank on Google.

3 steps to splitting your Ultimate Guide into chapters

I’m guilty of not splitting my Ultimate Guides into chapters as I thought a one-page guide provides a better reading (and searching experience).

I still believe that, which is why I’ll continue to offer my Ultimate Guides as PDFs for my email subscribers. This will help them read the guide in one document if they want to, or print it out.

But now that I learned much more from Local Viking and my own practice, and understand how the SEO behind a guide works, I’ll make sure I split my longer guides into 2,000-3,000 word chapters and give them more potential to drive traffic through Google.

To split your guide into chapters, just follow the steps below!

Step #1: Create your HUB page

You should start by turning your existing Ultimate Guide page into a HUB that connects the guide to all the chapters.

Think of your HUB as a central train station that all the trains go to:

tumblr oj8t00qbLT1r54c4oo1 1280

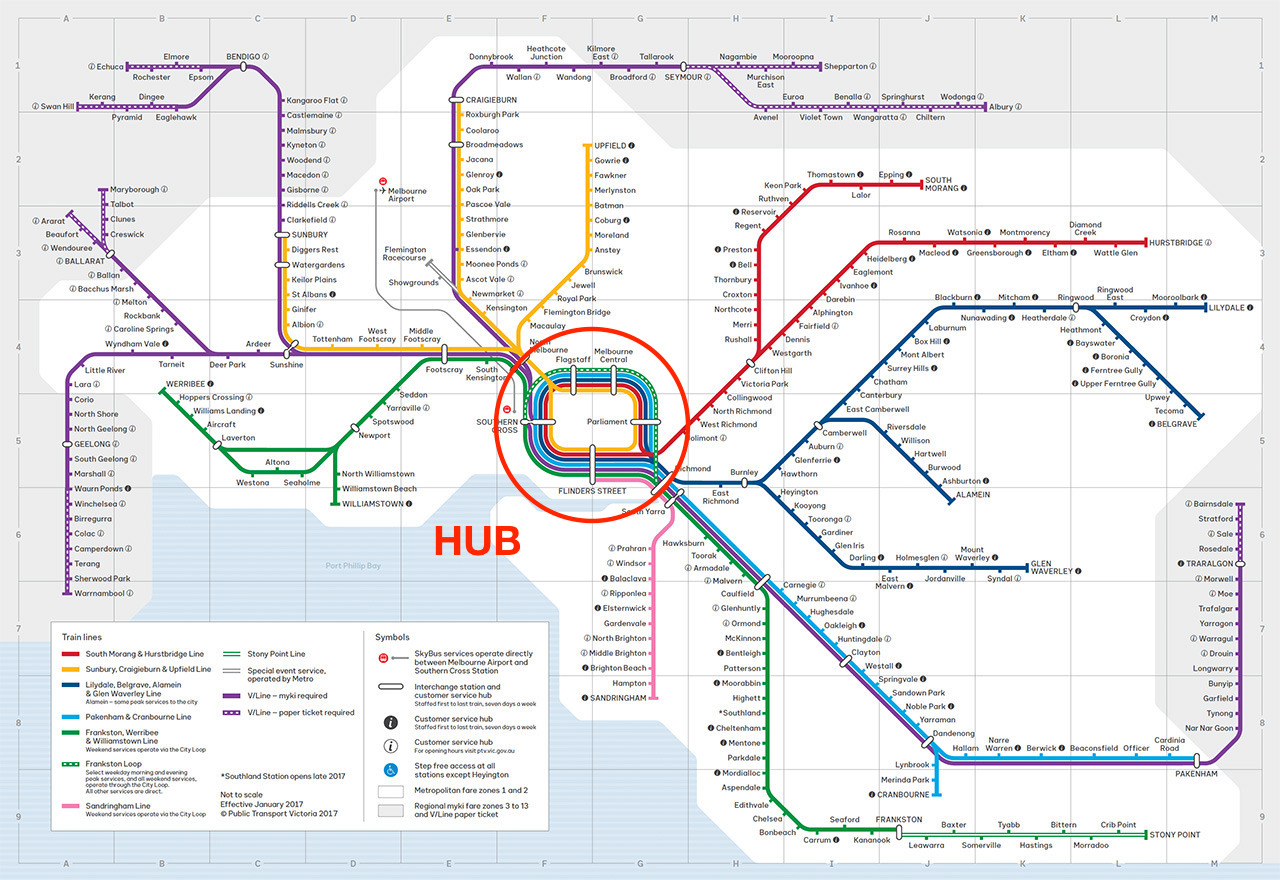
The HUB page should include:

  • Hook: The introductory story or section that draws your readers in and assures them they’re in the right place
  • Introduction: The 1-3 paragraph introduction that explains who you are, why you wrote this guide, who this guide is for, and establishes credibility.
  • Table of Contents: The links to all the chapters and short descriptions of what each chapter includes.
  • Call to Action: The opportunity to subscribe to your e-mail list and get the PDF version of your whole Ultimate Guide as a gift.

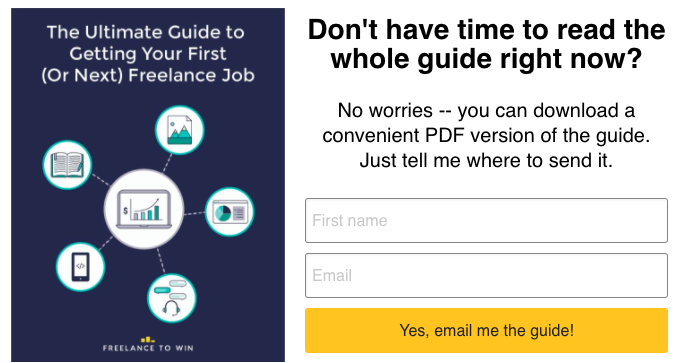
Below is an example of a HUB page from The Ultimate Guide to Getting Your First (or Next) Freelance Job.

It includes a hook:

Screen20Shot202018 07 1120at2011.54.1320AM

An introduction:

Screen20Shot202018 07 1120at2011.49.4920AM

A Table of Contents:

Screen20Shot202018 07 1120at2011.48.1920AM

And a call to action inside the opt-in box:

Screen20Shot202018 07 1120at2011.50.4120AM 1

Here are a few additional examples of HUB pages I love:

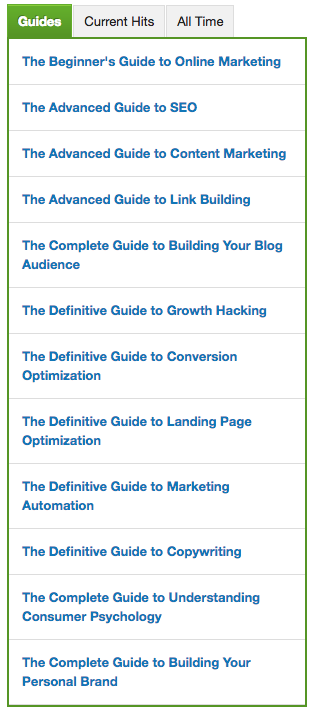
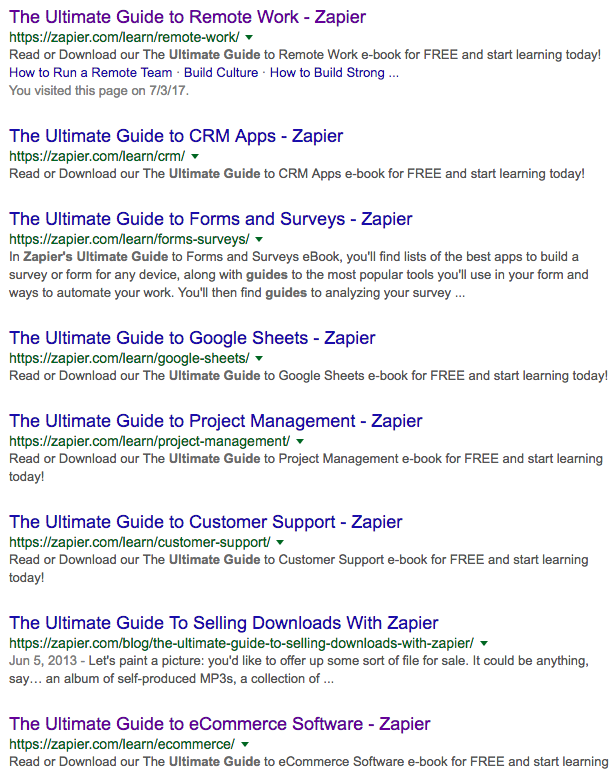
  • The Beginner’s Guide to Online Marketing from Neil Patel
  • The Ultimate Guide to Forms and Surveys from Zapier
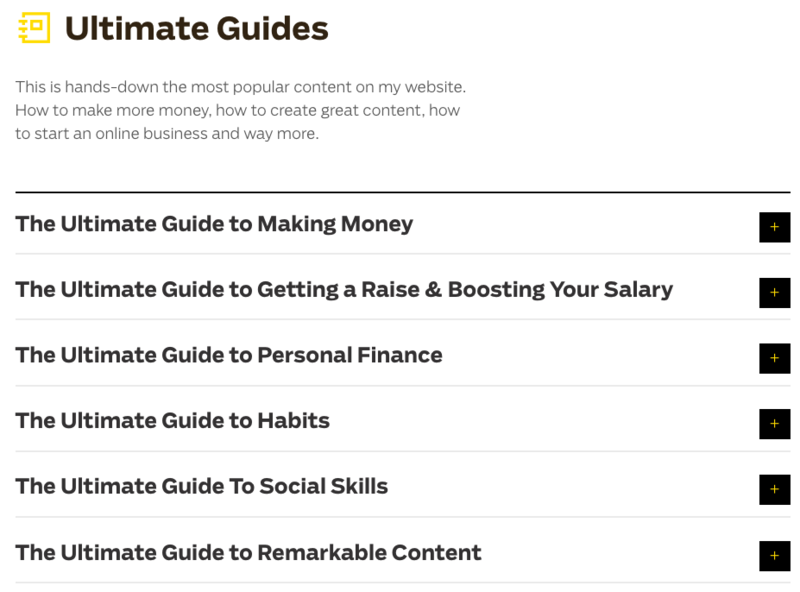
  • The Ultimate Guide to Social Skills from Ramit Sethi

You can see that these examples all have a similar structure and include the key sections (hook, introduction, table of contents and call to action), but have drastically different designs.

Now that you’ve seen these examples, you can go ahead and create your own HUB page for your guide.

Step #2: Create your Chapter Pages

Once you’ve created your HUB page, you should create Chapter pages for each of your chapters (this can be as simple as copy pasting the old content into new pages).

As you do that, make sure you create new SEO titles for each of the pages so the pages can rank high on Google.

Each of the chapter pages should include the navigational boxes (explained below), the content of the chapter, a call to action and an opt-in box.

Here’s an example of a Chapter page from Font Sizes in UI Design: The Complete Guide:

Screen20Shot202018 07 1120at2012.02.2320PM

As a call to action, you can use a specific comment request (we’ll talk more about comments below, under tip #5).

You should also always have an opt-in box at the bottom of the chapter that offers your readers the access to the PDF version of the guide and any bonuses that come with it:

Screen20Shot202018 07 1120at2011.50.4120AM

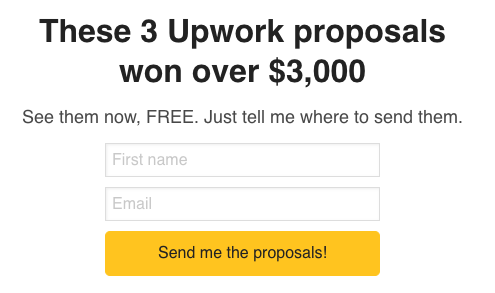
If you have the extra time, you can also develop specific bonuses for each of your chapters.

Like this Upwork proposals bonus that is at the end of the “How to write Upwork proposals that make clients say, “Take my money!” chapter of the above guide.

Screen20Shot202018 07 1120at2012.10.4720PM

Step #3: Add the Navigational Boxes

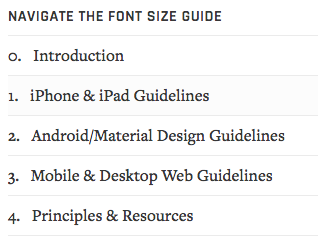
You’ll also want to create navigational boxes that you will add on the top of each Chapter page.

Navigational boxes could look like this:

Screen20Shot202018 07 1120at2012.15.0920PM

Or this:

Screen20Shot202018 07 1120at2012.15.3220PM

To create a navigational box, create a content box and then include the link to the HUB page to it. You can also include links to other Chapter pages if the names are short enough (see second example).

This will help readers that find your guide through one of the chapters read the whole guide.

You’ll also want to add a link to the next chapter at the bottom of each chapter:

Screen20Shot202018 07 1120at2012.16.2620PM

This way, your readers can easily jump from one chapter of the guide to another.

Extra credit: Create your navigational sidebar

Finally, you could create a navigational sidebar like this:

Screen20Shot202018 07 1120at2012.16.5120PM

Or this:

Screen20Shot202018 07 1120at2012.17.4120PM

This might be a bit trickier and require some coding skills. First you’ll have to find a good sidebar plug-in that allows you to link to chapters of your guide (you can usually customize a popular posts plug-in).

Then you’ll have to create custom sidebars for the HUB page and Chapter pages of your guide.

If this seems like too much hassle right now, don’t sweat it. Stick with the navigational boxes for now, which should be more than enough to let your readers navigate through your guide.

Tip #5: Use chapter-specific Calls to Action to get more comments

Once you split your Ultimate Guide into multiple chapters, you should focus on optimizing each Chapter page to get as many comments as possible.

Comments are very important if you want your Ultimate Guide to rank high on Google, and publishing a 20,000+ word Ultimate Guide and asking people what their favorite part of it was isn’t the best way to get comments.

Instead, you can create calls to action that are specific to each chapter of your guide.

For example, if I wrote a chapter of an Ultimate Guide about connecting with speakers at conferences, I could ask my readers what their horror stories are from connecting with conferences speakers.

How to ask compelling questions

The best questions for getting more comments:

  • Solicit an emotion from your readers
  • Ask readers to share their own stories and experiences
  • Help readers express their opinions

You can see some of those elements used in the example of conference horror stories above.

Everyone has a horror story like that – they’re usually filled with emotion, they’re interesting stories, and allow them to express their opinions.

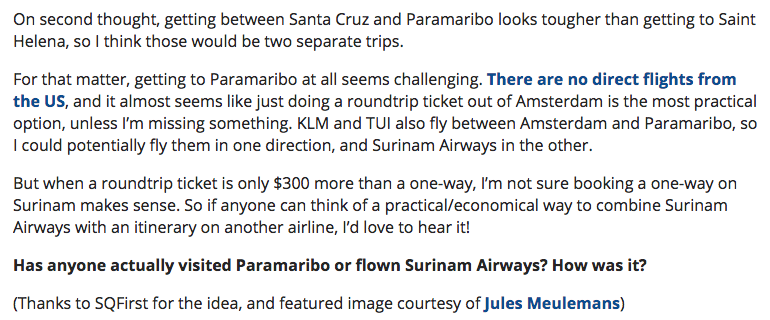
One of my favorite blogs to read for studying comments is One Mile at a Time. It’s a travel blog that does a phenomenal job with soliciting comments and gets hundreds of comments a day.

For example, in a post about Surinam Airways, they ask their readers about their experience with Surinam Airways.

Screen20Shot202018 07 1120at2012.25.3520PM

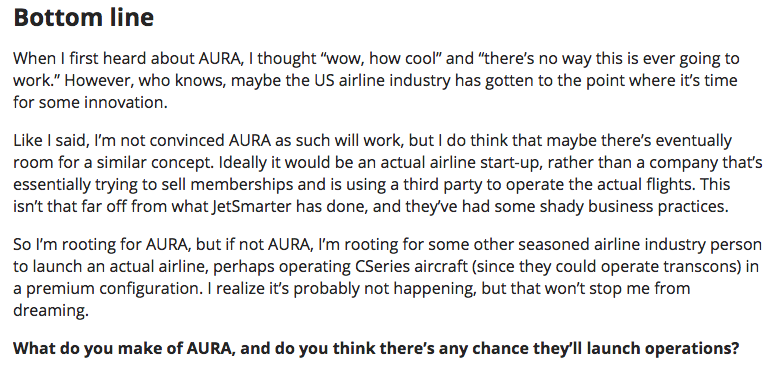
In a post about a new start up airline, they ask their readers for their opinion if the airline will succeed:

Screen20Shot202018 07 1120at2012.27.3720PM

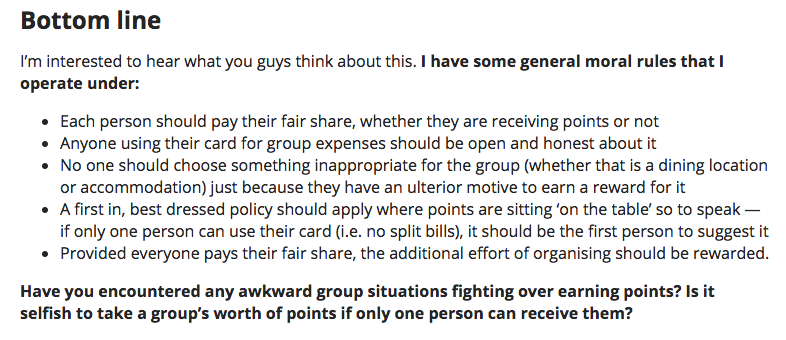
In a controversial post about crediting miles from traveling with friends to your account, they ask them about the emotional situations (fighting over points, selfishness).

Screen20Shot202018 07 1120at2012.29.5620PM

Pay attention to how they phrase their questions (“What do you think…”), and see if you can apply some of these examples to make your calls to action stronger!

6 ways to get more comments on your Ultimate Guide

To get more comments on your Ultimate Guide, you can use:

  • Launch Emails: Ask for comments in the emails you send out when you launch your guide
  • CTAs: Place specific calls to action at the end of each chapter
  • PDF: In the PDF version of your guide, you can ask people to leave comments on your blog by linking to dedicated comment sections
  • Social Media Posts: Ask people to comment on your blog in your social media posts
  • Engagement: Respond to all the comments that you get on your blog to entice more of your readers to leave their comments
  • Podcasts: If you talk about your Ultimate Guide during a podcast interview, you can ask the listeners to leave a comment on your guide

The more often you ask your readers to leave a comment and the more compelling your questions are, the more comment you’ll get on your guide, and the higher it will rank on Google.

Want more tips for creating killer Ultimate Guides?

These tips from our conversation with Steven are just the tip of the iceberg. There’s so much more gold that he shared, and we included the whole 90-minute interview in Ultimate Guide System.

But even if you don’t have access to Ultimate Guide System, you can start writing your first Ultimate Guide today.

You can download a free copy of The Ultimate Guide Checklist, my free 13,000-word e-book on writing Ultimate Guides.

You’ll learn:

  • How writing my first Ultimate Guide helped me go from 0 to $38,000 in coaching revenue in an industry where nobody knew me yet.
  • How I used Ultimate Guides to build an email list of 2,200+ email subscribers within my first year of starting my blog.
  • How one of my Ultimate Guides lead to a $36,381 product launch and helped me establish myself as an expert in a new niche.

To download your free e-book, simply leave your name and email in the box below and I’ll send it your way!

-Primoz

Which of these SEO tips surprised you the most? Would a guide on how to do link building help in the future? And which SEO tip will you implement in your next (or existing) Ultimate Guide? Let me know in the comments below!

How to Write Ultimate Guides Like Neil Patel

By Primoz Bozic 11 Comments

Do you want to know how to write an Ultimate Guide that attracts 361,494 website visitors and 8,421 email subscribers to your website?

Just imagine, how would that impact your business?

  • How much would your website traffic increase?
  • How much would your email list grow?
  • How many more products and services could you sell?

In this post, I’ll show you exactly how to do that – with expert tips from an expert in writing Ultimate Guides, Neil Patel.

neil patel

Neil Patel is the co-founder of companies like Crazy Egg, Hello Bar and KISSmetrics, and is one of the top SEO and online marketing experts out there.

He has also published 12+ Ultimate Guides on his website, attracting up to 361,494 website visitors and 8,421 email subscribers per guide.

neil patel's ultimate guide library

Last week I had a chance to jump on a Q & A call with Neil, thanks to our mutual friend Chris Winfield.

I’ve been wanting to talk to Neil about his experience with writing Ultimate Guides, so when the chance presented itself, I took it.

Neil Patel’s 6 Tips on Writing Ultimate Guides

During the Q & A session, I asked Neil the following question:

“Besides choosing an advanced topic, investing in design and splitting an Ultimate Guide into multiple chapters, what are the 1-3 most important things you should pay attention to when writing an Ultimate Guide? Also, what are the 1-3 things people THINK are important, but actually aren’t?”

I already read all of the posts on his website from 2013-2014 where he talks about writing Ultimate Guides and I didn’t want him to just tell me what I already knew. I wanted an answer that’s relevant to 2018.

I loved Neil’s responses so much I turned them into a blog post, which you’ll see below.

The first 3 tips are the common myths, and the second 3 tips are the things that you really need to pay attention to to write a successful Ultimate Guide in 2018.

Let’s dive in!

Tip #1: Don’t write long guides. Write thorough guides.

“Other people think that length is important. With these Ultimate Guides yes, you do want them to be thorough, but length doesn’t matter as much as thoroughness. If you can get the same message across in 7,000 words instead of 20,000, you should keep it at 7,000.”

I agree – just writing a long guide won’t necessarily make it good.

But write a guide that’s more thorough than 99% of the other content out there, and you have a winner.

So how do you actually write a “thorough guide?”

My advice: Use the “BIG SIX” outlining technique

You can create an extremely thorough guide by creating an extremely thorough outline.

In Ultimate Guide System, I teach a 6-step technique for outlining Ultimate Guides that I call I call the “BIG SIX” outlining technique:

  1. Shitty First Draft: Start by writing down all the things YOU think you should include in your guide, without worrying about flow, structure or grammar. This stage is messy.
  2. Research: Add the questions and problems from your audience that you want to solve to your outline. You can do this by going through your research notes and by analyzing other content out there. This stage is still messy.
  3. Clarity: Organize your notes into chapters, and move them into a sequence that makes sense. Turn any jargon or notes to self into plain english language that your audience would understand.
  4. Feedback: Show your outline to 5-10 people in your audience (IDEALLY you’d do this in person or via Skype) and ask them what’s missing from outline, what’s confusing and what you should throw out / expand on. Then improve your outline.
  5. Power ups: Add “power ups” to your outline that make it easier for your readers to turn your advice into action. This could be examples, case studies, scripts, videos, templates, spreadsheets, infographics, frameworks…
  6. Copy: Finally, turn the outline into the table of contents – something you’re comfortable with including in the beginning of your guide.

Go through these six steps (especially #2, #4 and #5), and you’ll write a guide more thorough than 99% of other guides out there.

You can also read my Ultimate Guide Checklist for more tips on writing a really thorough Ultimate Guide.

Tip #2: Don’t spend too much money on design

“Most people think that when you’re doing design, it has to be really pretty and amazing and visually appealing with a lot of graphics. That helps a little bit, but not much, and what you’ll find is that updating the content where there’re too many graphics is a pain, takes too long to update, and when the guides become updated people stop linking to them and sharing them.”

I’ve found this tip from Neil surprising given that he specifically recommended investing in premium design in the past:

neil patel's advice on design for ultimate guides

Many people that spent that kind of money on Ultimate Guide design echoed Neil’s new advice and told me that that investing in premium design wasn’t worth it.

Especially if you’re just starting out, don’t worry about spending thousands of dollars on design.

Instead, just make sure that you get these three things right:

My advice: The only 3 design elements you need

There are really only 3 things you need to worry about when designing your Ultimate Guide:

  1. PDF: I highly recommend creating a PDF version of your Ultimate Guide to accompany the blog post version of your guide. This will allow you to  The simplest way to do this is to write your guide in Google Docs and export it into a PDF. If you want to take it a step further you could get a designer to design it, through ROI of that is questionable.
  2. Opt-in Boxes: The most important part of Ultimate Guide design is to have “opt-in boxes” throughout your guide that allow you to turn your readers into e-mail subscribers. I recommend including opt-in boxes after your outline, at the end of your guide, in the sidebar and as a pop up.
  3. Sharable Cover: If you want your guide to be shared on social media, it’s a good idea to create a cover for it. You might want to create a vertical cover that you use as the PDF cover, but you should also create a horizontal cover with sharable dimensions and set it as a featured image for your blog so it shows up nicely on social media.

You can see a great example of all of the above in my Ultimate Guide to Attending Conferences.

It includes a PDF version of the guide:

pop up for your ultimate guide

It includes multiple opt-in boxes:

opt in box for your ultimate guide

It has a horizontal cover:

horizontal cover for your ultimate guide

As well as a shareable cover:

sharable cover for your ultimate guide

Tip #3: Find a unique angle for your Ultimate Guide

“A lot of people think that just because you create an Ultimate Guide about a major topic, it will get a lot of traffic, and that is completely false. It used to be that way 5-6 years ago, but nowadays you just cannot write a guide about any played out topic, you need to have a unique angle to it. There are already Ultimate Guides for everything, like SEO, PR, you name it. You need to figure out a unique angle to make your content better.”

It’s true that writing an Ultimate Guide isn’t as easy as it was 5 or 6 years ago.

The good news is that you’ll still get much better results from Ultimate Guides today than you’ll get from regular blog posts (as more people than ever are blogging, but relatively few people are writing Ultimate Guides).

If you want to hit a jackpot and attract thousands of email subscribers through your Ultimate Guide, you’ll definitely want to find a unique angle for it.

My advice: Use the Uniqueness Scorecard

To find out how unique your Ultimate Guide idea is, answer the following questions and rate your answers on a scale of 0-3 (0 = NOT TRUE, 3 = VERY TRUE).

  1. I’m targeting a very specific audience with this guide.
  2. I’m covering a very specific topic with this guide.
  3. I am solving a problem with this guide that nobody else is solving for my audience.
  4. I am serving an audience that nobody else is serving well.
  5. There aren’t any good Ultimate Guides on this topic out there yet.

You can go through this exercise by doing a quick google search.

Make sure you google around your guide topic to see how many people are doing the same thing, and how many existing guides are out there.

The max. score you can score here is 15.

  • Your uniqueness score is 10-15: As long as there is actual demand for this topic, chances are you’ve hit a home-run!
  • Your uniqueness score is 5-9: You’ll have some competition, but if you put in the work to write the best guide out there it can still be a huge success for you.
  • Your uniqueness score is 0-4: Your guide isn’t unique enough. You’ll want to pick a more specific audience, a more specific topic or a different audience / topic that nobody is addressing well yet.

Once you complete this exercise, leave a comment below this post and let me know what your guide is and what the uniqueness score for it was!

Tip #4: Link to your Ultimate Guides in your sidebar

“My Ultimate Guides rank really well because I link to them in the sidebar, on almost every page. That helps with ranking. It takes over a year to see results by just adding those links in the sidebar but it works.”

Here’s how Neil links to his Ultimate Guides from his sidebar:

neil patel's sidebar of ultimate guides

Not only will linking to your guides help you rank higher on Google, it will also help more people see your Ultimate Guides, especially once they get pushed back from the first page of your blog.

My advice: 12 easy ways to drive more traffic to your Ultimate Guide

The sidebar is just one of the places from where you can link to your Ultimate Guide.

Here are 12 easy ways to drive more traffic to your Ultimate Guide:

  • Sidebar: You can create an “Ultimate Guides” section on your sidebar that shows all of your guides alongside every blog post.
  • Navigation Menu: You can create a “Free Guides” item in the navigation menu of your website and list your Ultimate Guides underneath.
  • Homepage: You can link to your Ultimate Guides from your homepage (or include an opt-in box that offers access to the PDF version of your guide).
  • Welcome Email Sequence: You can email your Ultimate Guides to your new email subscribers as part of your welcome sequence.
  • Thank You Pages: You can include links to your guides on your thank you pages (that get displayed after someone subscribes to your email list).
  • Blog Posts: You can link to your Ultimate Guides from your blog posts (and include PDFs as opt-in offers below them).
  • Facebook Groups: If you run your own Facebook group, you can link to your guides from the group description.
  • Online Courses: If you have an online course, you can link to your guides from your course membership area.
  • Social Media Profiles: You can link to your guide from your Facebook, Instagram, Twitter and other social media profiles.
  • Media Bios: You can link to your Ultimate Guides from your media bios after any media profiles, guest posts or interviews you do.
  • Facebook LIVEs: You can link to your Ultimate Guides in the description or the comments section of a Facebook LIVE.
  • Email Signature: You can link to your most popular guides in the bottom of each email you send by creating a custom email signature.

The more of these you use, the more eyeballs you’ll get on your guide.

If you want to work through these in more detail, read my posts on 10 quick & easy ways to drive more traffic to your best blog posts and SEO for Ultimate Guides – you’ll love them!

Tip #5: Send your guide to everyone you know

“You need to get the word out there for the guide to do well, and this indirectly helps you get more links to your guide. You want to send your guides to everyone you’re connecting with on the social web. I’m not talking about just posting them on Facebook and LinkedIn, I’m talking about direct messaging every single person you know and saying ‘Hey so and so, thank you for being a friend, I just wrote this guide, feel free to go here and check it out.’ That drives a lot of the traffic when the guide first comes out.”

If you spend weeks and weeks creating an Ultimate Guide, it’s your responsibility to share your guide with as many people as possible.

But how can you do that in a non-spammy and authentic way?

The one thing I would NOT do is reach out to your network and ask everyone to share the guide by saying “Hey, I wrote this guide, can you please share it on social media?!?!?”, especially if you don’t have a strong relationship with someone.

People don’t like it when you only reach out to them when you want something from them, and they’ll feel weird if you constantly ask them to promote your work.

My advice: Use this email script

Instead, you can send your guide to your whole network in a much more authentic way by using the following script:

“Hey NAME,

[Insert Personal Message]

Over the past few months I wrote this super detailed [Ultimate Guide Title] – and I thought I’d send it your way because you might enjoy it (or know someone who does).

Have a great week!

-Your NAME”

Here’s an example of an email like this I’ve sent out:

reach out email for sharing your ultimate guide

It’s simple, not spammy at all, and very effective.

Tip #6: Email your guide to your email list

“Make sure you send out your guide to your list. If you don’t do this it won’t do as well. If you’re not collecting emails yet, make sure you start doing that.”

Emailing your guide to email list is one of the first things you should do once you write it.

Your email list is also one of the places where it’s totally ok to ask your loyal readers to spread the word about your guide:

Example email for sharing your Ultimate Guide

But there’s a way to take this strategy a step further, and get even more out of your Ultimate Guide:

My advice: Treat your Ultimate Guide as a product

If you really want to “squeeze the lemon” and get everything you can out of your Ultimate Guide, you should treat your Ultimate Guide the same way you would treat an online product.

Don’t just send out a single email to your list to launch your guide – write the whole launch sequence!

You could write a 5-day email sequence to successfully launch your guide:

  • The Problem: Talk about the problem your guide is solving, and why it’s important for you to solve. Hint at the release of a new amazing resource.
  • Sneak Peek: Share a “preview” of your guide by sharing one punchy technique from the guide. Announce that the big announcement of the guide is coming tomorrow.
  • Big Announcement: Share the full guide with your readers, and ask them to help you spread the word about it.
  • Epic Bonus: Remind your readers that they can get access to an epic bonus that you created for them that will help them put the guide into action (a checklist or a worksheet).
  • Reader Responses: Share the response from your readers about the guide, and link the readers to your guide one last time.

For example, for my Ultimate Guide to Attending Conferences, I could write this email sequence:

  • The Problem: “3 things you NEVER want to do at a business conference”
  • Sneak Peek: “The best way to connect with speakers at conferences”
  • Big Announcement: “The Ultimate Guide to Attending Conferences is Here!”
  • Epic Bonus: “How to prepare for your next conference in 24 hours”
  • Reader Responses: “3 reasons why you should read my latest guide (if you haven’t done it yet)”

You can get creative here and tweak the sequence to make it your own. Just make sure you give your guide a big push for a big chance of success.

Want to get started with writing your first Ultimate Guide?

If you’ve read this far, you’re probably interested in writing an Ultimate Guide yourself.

You’ll love my Ultimate Guide Checklist, my free 13,000-word e-book on writing Ultimate Guides.

You’ll learn:

  • How writing my first Ultimate Guide helped me go from 0 to $38,000 in coaching revenue in an industry where nobody knew me yet.
  • How I used Ultimate Guides to build an email list of 2,200+ email subscribers within my first year of starting my blog.
  • How one of my Ultimate Guides lead to a $36,381 product launch and helped me establish myself as an expert in a new niche.

I’ll also show you the exact 9-step checklist you can use to start writing your first Ultimate Guide TODAY!

To download your free e-book, simply leave your name and email in the box below and I’ll send it your way!

-Primoz

P.S. I’d love to know which tip you loved the most – leave a comment below to let me know!

How Top Experts, Companies and Entrepreneurs Grow Their Businesses With Ultimate Guides

By Primoz Bozic Leave a Comment

A few weeks ago, Ramit Sethi released his new e-book called “Your Move: The Underdog’s Guide to Building a Business.”

Since he published it, the book has become a huge success.

Tens of thousands of people have bought the book. It hit the #1 best seller in many categories on Amazon. It got hundreds of raving reviews:

It even hit the #1 place of non-fiction books on Wall Street Journal:

I’ve read the book an it’s phenomenal. It’s easily the best e-book you’ll ever find for $3.65 online. If you haven’t done so yet, make sure you pick up your copy!

So what do I love about the e-book most?

Surprisingly, it’s not that my story is mentioned in it (even though that’s REALLY cool).

What I love about it the most is that it’s not just an e-book… It’s an undercover Ultimate Guide that’s marketed as an e-book.

It’s not called an Ultimate Guide, but an “Underdog’s Guide”, but that’s ok – not all Ultimate Guides actually have “Ultimate Guide” in the name.

You have Ultimate Guides that are called “Beginner’s Guides”, “Essential Guides”, “Complete Guides”, “Advanced Guides”, “Parent’s Guides”, and so on and so on.

The name doesn’t matter as much as what an Ultimate Guide actually is – the most detailed piece of content on the internet on a specific topic (that usually comes with plenty of stories, examples, and a table of contents).

And that’s exactly what Ramit’s new e-book is. It’s by far the best, most comprehensive and detailed piece of content out there for underdogs who want to build a business.

It’s not a book as there’s no publisher or a physical copy. It also didn’t take Ramit years to create like his first book – it was completed in months instead.

Why did Ramit publish his e-book on Amazon instead of his blog?

It’s interesting that the guide was published on Amazon rather than on the website – and Ramit explained his decision in one of the emails to his readers.

He essentially said that he didn’t just want to rely on Google to drive more traffic to his website and that he wanted to get more readers through Amazon, which was an untapped market for him.

I think that at his stage of the business, with a huge audience that he’s already built, that absolutely makes sense. He can use the existing audience to get the 124 incredible reviews and propel the guide to the #1 spot on Amazon where it will stay for years to come. It also makes sense as he’s already getting a ton of traffic from Google and other sources.

Would I publish an Ultimate Guide on Amazon rather than on your own website when just starting out and don’t have a big audience?

Probably not, at least not exclusively. It’s unlikely you’d be able to replicate Ramit’s results when starting out.

Instead I would start with publishing it on your website, and THEN if your guide becomes a huge success you can think about putting it on Amazon as well, to create another stream of traffic to your website through it.

That’s actually something we’ll look into with some of our Ultimate Guide System students that have written 25,000+ world Ultimate Guides… As they are essentially small books already, and republishing them on Amazon might be a great way to spread the word about them.

That’s the beauty of creating an incredible piece of content like an Ultimate Guide.

Once you write a piece of content that’s 10x better than anything else out there on the topic you’re writing about, you can use it in many different ways to grow your online business:

  • You can publish it on your blog and bring more traffic to your website for years to come
  • You can use a PDF of it as a free gift for your email subscribers, and convert more of your new and existing readers into raving fans
  • You can use an Ultimate Guide to kick off your product launch, establish yourself as the go-to expert on the topic you’re talking about, add massive value to your existing readers and boost your launch revenues

Or, you can even republish it on Amazon, create an audiobook out of it… There’re endless options in which you can use an Ultimate Guide to grow your online business.

A lot of online business experts know how powerful Ultimate Guides are, which is why many of them create them.

For example, Ramit has written Ultimate Guides about social skills, starting an online business, finding a profitable business idea, creating remarkable content, personal finance and others:

And as he says himself, “this is hands-down the most popular content on his website”.

Ramit isn’t the only online business expert that understands the value of Ultimate Guides.

Selena Soo has written an Ultimate Guide to Meeting People at Events which she used to kick off her INFLUENCE product launch:

Her guide got featured in Business Insider (3 times!), Inc magazine, Huffington Post and I Will Teach You to be Rich which helped her reach hundreds of thousands of new readers and bring in thousands of high quality email subscribers.

Selena shared her whole story of:

  • Why and how she created her Ultimate Guide
  • How she used it to bring in thousands of high quality email subscribers
  • Why she things Ultimate Guides are one of the best ways to start an online business

In this interview we did together:

You can watch the whole interview here.

Another example of an expert using an Ultimate Guide to grow their online business is Bushra Azshar from The Persuasion Revolution.

Bushra rapidly built a 7-figure online business over the last few years, and recently created her Ultimate Guide to Persuasion:

She’s using her Ultimate Guide all over her website to capture more email subscribers (and blow them away once they sign up for it), and sell more of her Mass Persuasion Method program.

If you ever even remotely looked into SEO to grow your online business, you’ve probably heard about Neil Patel.

Neil is considered one of the top SEO experts out there (and he consistently gets well over 100,000 visits to his website), and that’s not an accident.

Neil has created his own library of 12 Ultimate Guides on his Quick Sprout blog that established him as the go-to expert on SEO and more or less everything related to it:

Whenever I want to look something up regarding SEO, his guides are the first place I look at. And whenever someone asks me about SEO, his guides are the first thing I point them to.

Neil was actually the person that made writing detailed guides popular back in 2014. In the past he wrote about why created 10+ Ultimate Guides and how he got 361,494+ visitors and 8,421 email opt-ins with one Ultimate Guide.

He also wrote this EPIC data-driven post about why 3,000+ word blog posts get more traffic than shorter ones. If you want to learn more about WHY Ultimate Guides rank really high on Google and take off, I’d definitely read that post.

Now I might not necessarily agree with everything that Neil shares about sharing Ultimate Guides. I don’t think you should blow $5k-$20k on a design of an Ultimate Guide when just starting out. I don’t think you should ask people to share your guides before you’ve built a solid relationship with them (and even then it might come off as needy).

I know that creating Ultimate Guides is about a lot more than just numbers and SEO, although that is a part of it (we talk more about how to create incredible Ultimate Guides in Ultimate Guide System that’s opening soon).

The point is – Ultimate Guides work. And they work REALLY well. How often do you see someone say that they got 361,494 visitors or 8,421 email subscribers from ONE post on their website? Pretty much never.

So far we’ve only talked about online business experts that create Ultimate Guides. But they aren’t the only people creating them and reaping the benefits of them.

Software companies use Ultimate Guides to sell more of their software.

Leadpages (one of the leading companies that offers landing pages whose software I personally use as well) recently wrote the Ultimate Guide to Landing Pages:

I absolutely love their guide and there’s many innovative techniques they used to create it that we break down in the Ultimate Guide System.

Their Ultimate Guide is ranking as the #1 result on Google for “Landing pages guide” and makes it to the first page of google for searches like “landing pages” or “how to create landing pages”:

In such a competitive field as landing pages, that’s pretty awesome. I’ve also heard that Leadpages is working on their next Ultimate Guide already, which just goes to show how valuable Ultimate Guides can be, even for software companies.

Another software company that uses Ultimate Guides to bring in more sales for their business is called Zapier. If you haven’t heard of it yet, Zapier helps you connect different apps (like gmail and Evernote) and automate your every day tasks to make your life a lot easier and save you a ton of time.

Zapier has written tens of different Ultimate guides, covering topics from using Google Sheets to Customer Support to eCommerce:

And of course, many of these rank as the #1 result on google for their topic:

What Zapier is doing here is super smart. They’re taking different audiences (like the customer support people) and different tools (like Google Sheets) that Zapier works well with, and writing the best pieces of content on the internet around them.

As the readers read their Ultimate Guides, they constantly see different case studies, ways in which Zapier makes their work easier, and so on – and they see signing up to Zapier as the next step after reading the guide. Brilliant.

Now you might be wondering… What if I’m not an online business expert or a big software company? Can I still use Ultimate Guides to grow my online business?

I’m so glad you asked. The answer is HELL YES. In fact, Ultimate Guides are ESPECIALLY useful for you if you’re not an established expert in your niche as they are the best way to become one.

So let’s look at some examples of how new business owners just like you used Ultimate Guides to make a name out of themselves and kick-started their online businesses.

First, there’s Peter Nguyen from Essential Man. Peter used to work as a leather jacket designer and wanted to build an online business around helping successful men dress better (or, as he would say it, look really f*cking good).

He wrote Ultimate Guides about things like buying a leather jacket, a beginner’s style guide, a summer style guide and others to jump start his online business:

The result? Peter built a following of thousands of email subscribers, doubled his traffic with Ultimate Guides, and created a consistent stream of sales for his Essential Wardrobe online course.

A few years ago, nobody knew about Peter. Now even Ramit Sethi is linking to his website when his students ask him what to wear to his events!

How powerful is that? How would YOU feel if an expert like Ramit endorsed your website?

I actually love Peter’s story so much that I asked him how he writes 1-2 of his Ultimate Guides / months, and he’ll be sharing all of his systems, strategies and results with you guys very soon – so stay tuned!

Then we have Ultimate Guide System student Nick who is rapidly establishing as the go-to expert on Facebook advertising for fitness & yoga studies with his Ultimate Guides.

He just published his Complete Beginner’s Guide to Monetizing Facebook Live For Your Fitness or Yoga Business:

Nick has been absolutely crushing it with his Ultimate Guide.

When he was just doing the research for his guide within the first few weeks of joining Ultimate Guide System, he scored two 1-on-1 coaching clients:

But when he released his guide, opportunities just started flying his way.

First, a major software company saw his Ultimate Guide and wanted to feature him as an expert in their upcoming Ultimate Guide:

First, he got a POTENTIAL JOB OFFER because of his Ultimate Guide:

How crazy is THAT?

And it was just the tip of the iceberg.

Shortly, Nick told me that a few of his 7-figure heroes opted into his email list:

And another person reached out to Nick for 1-on-1 consulting:

And did I mention that this guide was Nick’s FIRST post on his website? He got all of those opportunities WITHOUT having a following beforehand. And now he’s already working on his second Ultimate Guide.

I’ll write more about Nick’s story and how he developed his Ultimate Guide over the next few days too – so you’ll be able to hear all the juicy details of it.

Next up we have another Ultimate Guide System student Diana, who helps online entrepreneurs create and manage profitable online communities.

She just published her Ultimate Guide to Building a Profitable Online Community From Scratch:

Diana’s guide is one of the best and most detailed guides I’ve ever read. She worked her ass putting it together, and it shows.

Like Nick, this is Diana’s first post on her new website, and she already got 40 email subscribers within the first week (and she’s just getting started with spreading the word about it).

Selena Soo loved Diana’s guide so much that she shared it with her audience:

She’s getting raving emails from her email subscribers about her guide:

And even the top experts in the industry are now reaching out to her to get feedback on their communities.

Before she worked on her Ultimate Guide, not many people considered the go-to expert on creating profitable online communities – but over the next few months and years they definitely will.

And as you might have guessed, I’ll also be sharing Diana’s story (plus a few other stories) of how she wrote her guide with you over the next few days.

There’s also other Ultimate Guides that my readers and clients have written that you can check out, about a variety of different topics:

  • Allon wrote The Ultimate Guide to High Performance
  • Frank wrote The Ultimate Guide to Virtual Assistants
  • Matej wrote The Ultimate Guide about How to Find More Time and Energy to Start an Online Business
  • Camille wrote The Ultimate Guide to Getting a Date Without Going Online
  • Leslie wrote The Asian Inspired Ultimate Guide to NATURALLY Losing 30 Pounds For Busy, Ambitious Workaholics

Some of these guides helped my readers get hundreds of email subscribers, others helped them get new paying clients, and all of them helped them get a consistent stream of new high quality readers to their websites.

And we have plenty of new Ultimate Guides in the works – from guides about traveling, to songwriting, to teaching your kids about money.

As you can see, a lot of people see that there’s a huge opportunity in creating Ultimate Guides.

From top experts to software companies to driven entrepreneurs who want to make a name out of themselves and get their online businesses off the ground.

So WHY do they do it?

There’re many ways in which you can use Ultimate Guides to grow your online business (I cover 9 of them in my Ultimate Guide Checklist, and I’ll share more of them in the near future).

But the MOST important reason for creating Ultimate Guides is simple.

Ultimate Guides are the best and fastest way to establish yourself as the go-to expert in your niche.

If you write an Ultimate Guide for your audience that’s 10x better than any other resource out there on the same topic, then your Ultimate Guide becomes the go-to resource for anyone who wants to learn more about the topic.

And when you create something that’s 10x better than anything else out there, people notice that. They’ll notice you. They’ll read whatever you write for them. They’ll help you spread the word about it. They’ll want to talk to you, connect with you and work with you.

Ultimate Guides are your opportunity to stand out in a crowded market (like Peter did in the style world), transition into a new niche (like Diana did – she was in a completely different niche before), or even get your online business off the ground (like Nick did).

Once you create content that’s 10x better than anything else out there, you’ll automatically be different than anyone else.

You won’t need to worry about a crowded market, you’ll actually be able to use it to your advantage and bring in all the people that are interested in your topic.

It’s hard to do that with regular blog posts or an occasional guest post. There’s far too many of those out there nowadays, and it feels like everyone can have a blog nowadays given how easy it is to start one.

But I bet that very few people are creating REALLY good content like Ultimate Guides in your niche, and this is your opportunity to make a name out of yourself and become an industry leader.

As you do that, the rest will come:

  • You’ll have more and more website visitors (like Peter who doubled his traffic by writing less blog posts and more Ultimate Guides)
  • You’ll be able to grow your email list (like Neil who got 8,421 email subscribers from one guide)
  • You’ll be able to get your first few paying clients (like Nick who got 3 paying clients and a job offer with his guide)

And the best part? You’ll be able to grow your online business with Ultimate Guides over and over again.

Remember how Ramit, Neil, Peter and Zapier wrote multiple (often 10+) Ultimate Guides to continue growing their online businesses?

You can do the exact same thing.

You don’t have to worry about regular blog posts, guest posting, Facebook ads, SEO, Facebook challenges, and other tactics to grow your online business.

You can pursue them if you want to of course… But you know you won’t NEED them to grow your online business.

You can just create more Ultimate Guides down the line, and you’ll KNOW that with each Ultimate Guide you publish, your business will grow more and more – for years to come.

And the thing is, while anyone can write blog posts or use Facebook ads for their business, not anyone can, wants to, or is willing to write Ultimate Guides.

The barrier to entry with them is way higher, as they require weeks (and sometimes months) of work to complete.

There will always only be a few people in each industry who are willing to put in the work to make them come to life, and reap the benefits of them. And you can be one of those people.

Get started with creating your first Ultimate Guide TODAY

If you want to start working on your first Ultimate Guide, I invite you to check out my FREE 13,000+ word Ultimate Guide Checklist to get started.

It’s by far the BEST, most comprehensive and detailed FREE resource you’ll find online on creating Ultimate Guides.

Here’s what you’ll learn in it:

  • The biggest mistakes people make when creating Ultimate Guides (and how to avoid them)
  • 9 Ways in which you can use Ultimate Guides to grow your online business (whether you’re an established business owner or just starting out)
  • My never-before-seen checklist for creating Ultimate Guides (with real life examples and secrets I’ve discovered over 5+ years of creating them)

…and a lot more.

I’ll also be releasing another awesome resource to my email subscribers shortly that will make writing Ultimate Guides easier than ever before – and to make sure you get an email with it too, make sure you get your free copy of the Ultimate Guide Checklist.

-Primoz


7 Mistakes to Avoid While Writing Your First Ultimate Guide

By Primoz Bozic 1 Comment

Writing an Ultimate Guide isn’t easy.

Even with the right support, it can take MONTHS to get one written – and many people get stuck in their perfectionism and never finish it.

Over the past few months, I worked with my 1on1 client Matej on creating his Ultimate Guide about “How to Find More Time and Energy to Start an Online Business”.

I’m super proud of all the work that he’s put into the guide, and it’s a really incredible piece of content.

After he finished writing the guide, Matej reached out to me and shared with me a few key lessons that he learned from writing his first guide, that he will use to write his next Ultimate Guide in half the time.

I absolutely loved these lessons because they show the other side of writing really exceptional content that very few people talk about.

I loved how Matej openly shared the mistakes that he made, as well as the specific ways in which he will avoid them next time – so I decided to share them on my blog.

If you’re thinking about (or in the process of) writing your first Ultimate Guide, this is a must read.

Matej, take it away :).

Matej’s mistakes and key takeaways from writing his first 25k word ultimate guide

In late December 2016 I started working on a bigger project for my side business – writing an ultimate guide “How to Find More Time and Energy to Start an Online Business”.

I knew it does not have to necessarily be a huge project lasting for months. However, I wanted to make it great, highly valuable for my readers for the years to come so I wanted to put a lot of effort into it.

With the demanding full-time job and two small kids at home (2 and 5 year old) I knew it’s going to be a challenge but exciting one. I wanted to write an Ultimate Guide for months but was always avoiding it.

Suddenly, my mentor Primoz Bozic shifted his business to helping people writing Ultimate Guides and I’ve become one of his first 1on1 clients. So we started working together.

Expected time frame for publishing the guide was 2-3 months.

I was very excited to make it happen.

Looking back, it has been 5 months until I finally published my Ultimate Guide.

I know I could have published my guide a lot faster, and now I know exactly how to write and publish my next Ultimate Guide in half the time.

Today I want to share with you the biggest mistakes I’ve made while writing my first Ultimate Guide and the key takeaways from the process that you can use to successfully write your first Ultimate Guide without spending 5 months on it like I did.

Mistake #1: I tried to make the Table of Contents too perfect

When Primoz and I started working together, things went really well. I had a lot of my free time since there was a Christmas holiday, and I didn’t need to go to work.

I spent most of that time jumping on calls with a few of my readers and friends to narrow down and validate my idea for the Ultimate Guide.

Validating my business idea by talking to people had always been tough for me, but finally I’ve managed to do it and it was actually a ton of fun.

Not only did those calls help me with my idea, but I’ve also aimed to add massive value to those people as well.

Every time I jumped on a call with someone to help me with the idea, I also offered to help them out with any questions they would have about finding more time and energy to work on their side business.

As I did that, one of the readers loved my help so much that he wanted to work with me.

That’s how I landed my first ever client from my side business:

Once I was confident about the idea I’ve started working on the Table of Contents.

The first draft was done pretty fast, but then I hit a roadblock.

I was not sure if it’s great enough. And because I wanted to make it perfect I was tweaking the Table of Contents for about two weeks.

I went back to the people that helped me validate the idea for my guide and asked them to give me feedback on my Table of Contents.

The problem was that I needed to wait for them to get back to me, then incorporate their feedback, and repeat the process over and over again.

This lead me to procrastinating on my guide because I did not feel like working on it again and again. There were quite a few days when I was not working on it at all because I did not feel like it.

Luckily, Primoz stopped me from further procrastination and told me that my Table of Contents was good enough to move forward.

I spent just one more day polishing the final version of the Table of Contents by jumping on Skype calls with two friends who helped me finalize it right on the spot in the way I was confident that it’s great.

Here’s what the final version of the Table of Contents looked like:

What I’ll do differently next time:

After writing the first draft of the Table of Contents, I’ll get on a call with 1-3 of my ideal readers and go through it live together.

It’s much easier and faster for both parties than waiting for people to leave you comments in the google doc. It’s also much better talking through what they think about the guide and how they feel about it.

Together, we can easily tweak some of the headlines to make them more compelling and find the right order of the chapters so the guide flows well.

I won’t spend more than one week on the Table of Contents because I know it will lead to procrastination and doubts if it’s great or not.

I’ll spend a week on it, make it good enough, and then make further changes as I’m writing the guide if I need to.

Mistake #2: I bit off more than I could chew

As soon as I completed my Table of Contents, I knew that the guide would be huge.

I knew that because I always write very long posts where I try to explain everything in detail to give as much value to my readers as possible.

I thought that was OK since I wanted my guide to be really great, and the best piece of content on the internet on that topic.

However, looking back and seeing that this was my first ever Ultimate Guide, I would probably split the guide into a few smaller topics.

This way, I’d cover just one specific topic in great detail (like how to find the energy to work on your side business after you come home from work), and write a guide that’s about 10k words long instead of going for that 25k beast:

Doing this would help me create the guide two or three times faster, and I’m sure it would also be easier to keep the momentum while writing my guide.

What I’ll do differently next time:

The next guide I’ll create will be about a smaller, more specific topic.

I’ll aim for something like 7-12k words with it, and focus on getting it out there faster.

If you’re planning on writing your first guide, I encourage you to start small too.

You want to test how Ultimate Guides resonate with your audience andlearn how to create them while having fun.

You don’t want to spend months figuring things out or getting lost in the process, especially if you do not have anybody to hold your hand along the way.

I also encourage you to take into account what kind of a writer you are.

If you don’t have a problem with writing long posts, then it’s OK to create a longer guide. But if you tend to write shorter posts and struggle with writing really long ones, pick a guide that’s shorter and create a longer guide down the road when you’re more comfortable with it.

Mistake #3: I wrote about topics I was not too confident about

If you do a lot of research for your Ultimate Guide in the beginning, you will get a lot of feedback on what you should include in the guide.

This can be good and bad.

When I started writing my guide, I knew that mindset issues plays a huge role in our performance and achieving the results especially with business on the side.

From the feedback I’ve gotten, I saw that other people would want to learn more about solving them.

The problem for me was that I did not have proven solutions and experience with solving them. I have some good tactics which helped me, but I wasn’t too confident about giving too much advice on that topic.

However, because I really wanted to help my readers, I still wanted to write a chapter about those things to satisfy them. That’s what they told me that they want.

And we always tend to please people.

This lead me to a lot of procrastination on writing that chapter.

I did not want to start writing it because I did not have the best of ideas to write about.

Instead, I spent a lot of time researching the materials I could include in the guide. I was trying to learn more about those problems so I could better explain them in the post.

That was a big mistake, because this one chapter delayed writing the guide for a few extra weeks.

What I’ll do differently next time:

Whenever I won’t feel confident about writing about a topic that’s in my Table of contents, I’ll skip it.

I’ll remove it from the Table of Contents and perhaps revisit it down the line once I’m more confident in giving advice about it.

I know that there’s a lot more I can write about. Removing one chapter from my guide will not make or break it.

I encourage you to do the same.

As you’re writing your guide there will also be times when you’ll face the writers block or you will feel like you do not want to write about one section at the moment.

If you’ll still be confident you can write it it does not mean you have to remove it from your guide.

Just skip the chapter for a week or two and jump to the next exciting one. You can always come back later when the inspiration strikes you, or you remember those nice stories you wanted to cover in that chapter.

The most important thing when writing your Ultimate Guide is to keep your momentum going, and keep writing as much as possible in succession which will pretty much ensure that you won’t get stuck.

Mistake #4: I spent too much time editing my guide

I have to admit that my perfectionism prolonged the publishing of the guide by 2-3 months.

That’s because I wanted to make it the most epic guide which would stand out and stand the test of time.

Because I wanted to make sure this would really happen, I spent about 2 months editing the guide.

The guide has 25k words which took quite some time to go through.

As I edited the guide I was played too much with the content, grammar, styling the phrases.

Many times I’ve rewritten sentences more than 5 times to make them easier to read and more “compelling” as if I’d been writing a sales page.

There were also many sections which I thought were not good because I had written them during the sessions where I had lower energy.

I really saw the difference in the quality. And my mentality urged me to rewrite them completely.

And that’s what I did.

This added tens of hours into the process of getting the guide finished.

What I’ll do differently next time:

Next time I won’t spend so much time editing my guide.

I’ll do just one round of editing while focusing just on fixing only broken sections, things that are truly hard to understand, or things that do not fit well the guide as a whole.

I won’t try to make it perfect.

I know that the most important thing is to share my highly valuable advice with my readers.

One unclear sentence or paragraph here and there does not make a huge difference in this long piece of epic content.

What makes the true difference is the content itself.

Instead of making my next guide perfect, I’ll just focus on making it more 10x more epic than anything else out there.

Mistake #5: I tried to include every influencer I knew in the guide

I knew that I can add value to the influencers I wanted to build relationships with by mentioning them in the guide.

Especially by sharing their advice that I’ve implemented in my life. Mentioning the things that they taught that worked for me.

I wanted to spread the word about as many people as possible in my guide, and I created a huge list of people I wanted to include in it:

It was a good intention. But, it cost me many hours by browsing through the articles of influencers to find the best fit for my guide.

And while doing so I got often caught up with reading new articles and then thinking about new ideas. This took my focus away from writing the guide.

What I’ll do differently next time:

Next time, I’ll pick just a few influencers that I want to build relationships with whose advice is already a good fit for your guide.

I won’t try to include everyone, just the people who I already know and that have already helped me with their advice.

I’ll mention the influencers who made a difference in my life or life of my clients that are directly relevant to the topic I’m mentioning in the guide.

If I find myself browsing through their articles to find one that’s a good fit, I’ll skip the influencer and possibly talk about them in one of my future guides.

Mistake #6: Spending a month on my content upgrade

Working on my Ultimate Guide helped me get a lot of clarity around my business idea.

Because of that I decided to create an email course as a main opt-in carrot for my website. I would also use that free course as a content upgrade for the whole guide:

Initially, I thought it’d be easy and fast. I was really convinced and confident.

It turned out to be quite the opposite.

Again, I wanted to make it as best as possible, so it took me ton of time to write email sequence.

Not only writing it took me so much time, but setting everything up on my website and in the email service provider was a lot of work.

It was a whole new project which should have been done after publishing my guide.

This was another thing that delayed publishing my guide by another mont..

What I’ll do differently next time:

I know that creating a content upgrade is a great way to maximize my opt-ins from the ultimate guide.

However, next time I won’t spend a whole month on it and try to make it really big.

Instead I’ll create something crunchy for my readers. Something they could easily implement and will give them immediate results.

For example, I could create a quick cheat-sheet of the tactics from the guide, or a one-page worksheet that would help them implement my advice faster.

Mistake #7: I didn’t enjoy the process all the time

Probably the worst thing I was doing through this project was thinking about the outcomes of it.

I was super excited at the beginning and had a ton of fun working on my guide for the first few weeks.

But then it got into my head and I started to think about the number of subscribers, or even potential coaching clients I could get as a result of publishing the guide.

That’s why I wanted to make it perfect and was doing all of those mistakes mentioned above.

In the process I forgot to have fun with it, to enjoy those quiet early mornings, working sessions in my favorite coffee shop, or the late nights sipping the red wine.

I’ve lost the excitement because I was pushing myself to make it fast and perfect.

What I’ll do differently next time:

Next time I’ll focus on having a lot more fun with my Ultimate Guide. I’ll enjoy the process.

I’ll write about the topics that I like talking about with people. About the advice I give to my readers. And the things I thrive learning more about myself.

If you’re writing your first Ultimate Guide, the best piece of advice I can give you is to have fun with it.

You’ll learn a ton and also get a lot of experience throughout the whole project.

Don’t worry so much about the outcome, and focus on the fact that you are creating something amazing.

Want to get started with writing your first Ultimate Guide?

I hope you’ll be able to use some of this advice to successfully write your first Ultimate Guide.

If you do so, I’m sure it’ll help you create an amazing and very helpful piece of content for your readers.

While enjoying the process and having a lot of fun along.

If you want to take a look at the Ultimate Guide that I wrote, you can read the whole guide here:

How to Find More Time and Energy to Start an Online Business [The Ultimate Guide]

If you want to get access to the whole framework that Primoz and I used to help me write my first guide, make sure you read Primoz’s Ultimate Guide checklist below:

Get your FREE copy of the 13,000+ word Ultimate Guide Checklist

And if you’re guilty of making one of these mistakes yourself, share which one it is with us in the comments below.

To your success!

-Matej

How I learned to look really f*cking good (and saved my relationship)

By Primoz Bozic Leave a Comment

How I learned to look really f*cking good

Over the past few years, I’ve had a love-hate relationship with developing my personal style.

When I was in high school and college, I had NO IDEA what dressing nicely looks like and why it mattered (which might explain why I was single for a long time). I would basically wear whatever clothes my mother bought me, and if I was lucky I would get a nice shirt or a pair of socks for Christmas.

I had no idea about what clothes to wear, how to make them fit well, why fit is even important, what kind of colors to wear… Nothing.

Dressing up in some jeans and a short sleeved shirt was more or less the pinnacle of my style (although I managed to somehow ruin that by doing awkward poses like these…).

img1

As I started my own business, I realized that looking good might actually bring me more business opportunities (here’s a great article on that topic from Neil Patel).

This was the first time I went on a mission to learn how to dress better.

Naturally, I went to the more expensive stores, looked for the nice custom hang tags with string made from quality textiles, bought a few big brand items and tried to get styling tips from the stylist in the stores. I essentially asked “what would look good on me?” and they’d bring me a bunch of expensive clothes.

For example, here’s a photo of me that you might have seen from my Business Insider feature – I bought this blazer on sale, and the only reason why I bought it was because it was from Hugo Boss and it was orange on the inside (yes, my thought process was amazing…).

img2

I don’t think I looked bad in that blazer, but the problem was that it was made of a weird fabric and I couldn’t really use it on a day to day basis. The blazer was too hot to wear in the warmer months, and in the colder months it was too cold to walk around in it.

The end result? I ended up wearing it about 3 or 4 times and then burying it in my closet where all it did was collected dust.

Shortly after I spent thousands of dollars on new clothes from expensive brands, I decided that just wearing nice clothes wasn’t enough. I wanted to look good naked as well. I started going to the gym and eating healthier, and soon all of my pricey clothes were way too big and didn’t fit me any more.

Whoops. I’ve just spent thousands of dollars on something I’ll never be able to use again.

As that happened, I decided it wasn’t worth buying nice clothes if I’m going to lose more weight, and somehow I also got the idea that now that I had a six pack, I didn’t really NEED to wear nice clothes, and that I could look good in anything.

And because I never actually learned HOW to dress better (not that I didn’t want to, but the generic style advice all over the internet wasn’t really that helpful), I literally decided I could wear ANYTHING…

That is how this happened:

img3

Yup, for whatever reason I thought it would be a good idea to fill my wardrobe with pink and neon green clothes (not pictured, thank god). No good excuse for that. And my girlfriend absolutely HATED my neon green t-shirts and was begging me to get rid of them.

A few weeks later, my style (thankfully) took a turn for the better.

One of my friends, Peter Nguyen reached out to me via a Facebook message and offered to help me with improving my style for a piece of content he was working on.

Peter runs a site called The Essential Man where he helps guys look really f*cking good:

img4

Since I knew that Peter knew what he was deciding I decided to give it a shot. We had a brief conversation where he shared a few wardrobe tips with me and helped me get started with building a new wardrobe that would fit my body shape and contain clothes that I could wear every day and look great in them.

After our call, I went on to stalk Peter a bit on his website and stumbled upon his free 2016 Fall Style Guide:

img5

This single piece of content was the best piece of content with men’s style advice I’ve ever read. It was incredibly organized and detailed, and it was written in a language that I (and not just the style fanatics) could understand.

As soon as I started reading the guide, I couldn’t stop.

I read until the end of it in one sitting. If before reading the guide I had a vague idea of what my fall and winter wardrobe should look like, after reading the guide I knew EXACTLY what to do next.

I knew which clothing items to buy first. What to pay attention to while shopping. What NOT to buy. What the price points of the items that I wanted to buy should be. And even the exact brands that were Peter’s favorites. It really felt like he thought of everything as he was writing the guide, and that he really understood where I was and what my struggles and concerns were.

Shortly after I finished reading the guide, I went on a shopping spree and bought most of the items that he recommended in the guide. For the first time ever, I knew what I was looking for in the store, and the shopping experience became so much more fun and effortless.

I ended up with a wardrobe that I actually liked, that fit me well, and that I looked great in. And I’ve never looked back. Now I can look good if I’m just going on a casual date…

unnamed

If I’m exploring NYC & DC in the winter…

img6

Or if I’m doing a photoshoot for my new website:

img7

Dressing better not only helps me look better in photos that I post on my website and Instagram and allow me to look more professional at the events and meet ups at the events, it also allows me to FEEL better on a day to day basis.

There’s just something about dressing up nicely that allows me to be more confident in what I have to say and be more productive when I sit down to work.

And best of all, now my girlfriend doesn’t have to dump me for wearing neon green t-shirts. It’s a win-win.

I can honestly say that Peter’s free guide has been one of the best and most impactful pieces of content I’ve ever read.

And it was just ONE of many outstanding pieces of content that he has created over time.

He also wrote…

  • The Essential Guide to Surviving Hot Weather with Style
  • The Ultimate Guide to Buying a Leather Jacket
  • A Beginner’s Guide: 16 Essential Style Tips For Guys Who Want to Dress Better

And all of those are as good as the Fall Style Guide that I first read.

Because his guides are so remarkably good, I don’t even bother with looking elsewhere for style advice. I know that if I have a question about style, Peter has either already covered it in one of his guides, in his Essential Wardrobe course, or I can shoot him a quick email and get a great response.

Over the past few months, Peter has become my go-to expert for style advice.

I open and read every single one of his blog posts and emails, because I know that when Peter writes something it’ll be GOOD.

And because I know how good his content is, I’ve happily shared it on my social media in the past (and I’m even writing this email about it), even though he never asked me to:

img8

If you’ve enjoyed Peter’s story (or content), and might want to create something like this yourself, then I have great news for you.

I’ll talk about how to create content that’s “really f*cking good” (as Peter would say) over the next few weeks, and I’m excited to share some of the best tips for creating epic content with you that I’ve never shared before.

Tips that will help YOU create outstanding content for your audience that will absolutely blow them away, make their lives better and bring in more high quality traffic, email subscribers and sales for your business. And help you become the go-to expert in your niche.

Just like Peter has changed my life to the better with his content, I’ll show you how you can do the same with your audience.

To help you do that, I created an epic, 13,000+ word Ultimate Guide checklist where I share with you the exact process I use for creating epic guides that can help you get started with creating epic content for your audience.

ultimate guide checklist cover (1)

Here’s what’s included in the 13,000+ word Ultimate Guide Checklist:

  • The biggest mistakes people make when creating Ultimate Guides (and how to avoid them)
  • 9 Ways in which you can use Ultimate Guides to grow your online business (whether you’re an established business owner or just starting out)
  • My never-before-seen checklist for creating Ultimate Guides (with real life examples and secrets I’ve discovered over 5+ years of creating them)

To download your free copy of the Ultimate Guide Checklist, simply leave your name and email address below and I’ll send it to you within a few minutes!

-Primoz

  • Page 1
  • Page 2
  • Go to Next Page »

Copyright © 2025 · Primoz Bozic